Thanks', what size did you use? Any rubbing issues?Vzike wrote:The tires are Cooper Discovery A/T3. I put them on my Encore over a year ago, and they are great. We drove it from the West Palm Beach, Florida area to Key West over the Thanksgiving weekend. It was about 250 miles one way. The tires performed very nicely in the rain we got on the way down, and on the Interstate. We cruised at 55 or 60. I'm very happy with them. In Special Operations, we had the option to move away from standard military tires. These are similar to the ones we used. Wider, better tread, and more stable.
For the 77 MUTT, I'm using the same tires, but putting the white lettering on the inside. I plan to put a cover on the spare.
'77 A2 - My first project
Moderators: rickf, raymond, Mr. Recovery
-
csmith
- Brigadier General

- Posts: 2086
- Joined: July 20th, 2009, 11:49 pm
- Location: Va. Beach & NC Outer Banks
Re: '77 A2 - My first project
1976 M151A2 4 Color Cammo Mutt, aquired August 09
1976 or 7? M151A2 "Miss Sandy" Driver, aquired May 2010
Former owner M151A2 "Miss Saigon" Vietnam Rescue Sold Sept 09
Fond appreciation for the M151 Breed!!
1976 or 7? M151A2 "Miss Sandy" Driver, aquired May 2010
Former owner M151A2 "Miss Saigon" Vietnam Rescue Sold Sept 09
Fond appreciation for the M151 Breed!!
-
Fil Bonica
- Brigadier General
- Posts: 2607
- Joined: December 9th, 2007, 10:49 am
- Location: ~ Heaven ~
Re: '77 A2 - My first project
Been running a set of Discovery tires for 10 years .
Actually had the same set on three A2s.
Fil Bonica
Actually had the same set on three A2s.
Fil Bonica
K1ABW
-
Vzike

- Sergeant Major of the "G"

- Posts: 729
- Joined: December 27th, 2013, 4:05 pm
- Location: Jupiter, Florida
Re: '77 A2 - My first project
Got the mechanical pressure gage. The pressure is fine in the engine. Then swapped off the senders with my Encore. They both work. the gage issue must be with either the wiring or the gage.
Waiting for another water pump.
Waiting for another water pump.
Vin Zike


Re: '77 A2 - My first project
You said you had issues wit other gauges, did you check the grounds on the gauges.
1964 M151A1
1984 M1008
1967 M416
04/1952 M100
12/1952 M100- Departed
AN/TSQ-114A Trailblazer- Gone
1984 M1008
1967 M416
04/1952 M100
12/1952 M100- Departed
AN/TSQ-114A Trailblazer- Gone
-
Vzike
- Sergeant Major of the "G"
- Posts: 729
- Joined: December 27th, 2013, 4:05 pm
- Location: Jupiter, Florida
Re: '77 A2 - My first project
Have not messed with the gages, except to install a mechanical oil pressure gage. The oil pressure is fine. I then pulled the the oil sender and swapped it with the one in my Encore. It works fine, so I know the issue is either the new gage or wiring. I'll check the grounds and the wiring tomorrow.
I took apart the water pump I rebuilt and found that I failed to polish the impeller seal surface. I re-polished it and put it back together. I'll put it back in tomorrow and test the coolant system.
I have adjusted the parking brake, and it seems to work. Stalled the engine with the brake, and it didn't seem to heat up while running.
Vin Zike
-
D Pizzoferrato

- Master Sergeant

- Posts: 345
- Joined: May 1st, 2010, 8:16 am
Re: '77 A2 - My first project
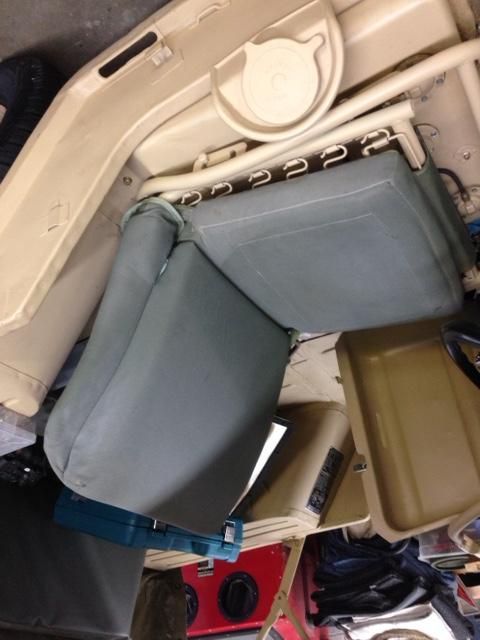
An FYI concerning your front seats; the backrest cushions are early HMMWV Driver's Seat Backs. I can't see enough of the bottom cushions, but would guess, from what I can see, that they are also HMMWV.
Visit our Website! www.odcloth.com for your Canvas needs
Visit our AM151A2 restoration page http://www.odcloth.com/mymutt/1979am151a2.html
Visit our PBR Restoration Site. http://www.pbr6927.com
Visit our AM151A2 restoration page http://www.odcloth.com/mymutt/1979am151a2.html
Visit our PBR Restoration Site. http://www.pbr6927.com
-
Vzike
- Sergeant Major of the "G"
- Posts: 729
- Joined: December 27th, 2013, 4:05 pm
- Location: Jupiter, Florida
Re: '77 A2 - My first project
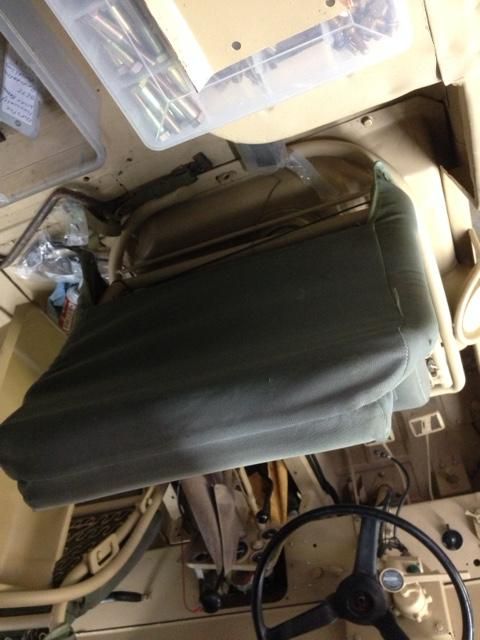
AH! Thank you. I was discussing the seats with We Be Webbing and also Fil yesterday. We thought they might have been a custom set someone made. They are a bit more comfortable than the ones in my Encore. I guess I need to find a set of front seat cushions!!!
Last edited by Vzike on February 6th, 2015, 11:36 am, edited 1 time in total.
Vin Zike
-
Vzike
- Sergeant Major of the "G"
- Posts: 729
- Joined: December 27th, 2013, 4:05 pm
- Location: Jupiter, Florida
Re: '77 A2 - My first project
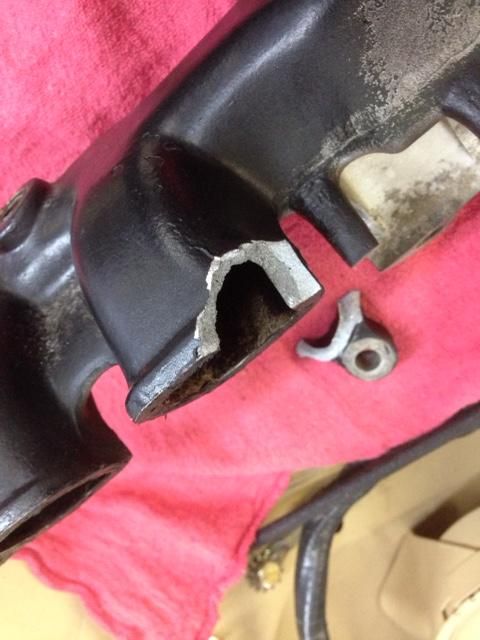
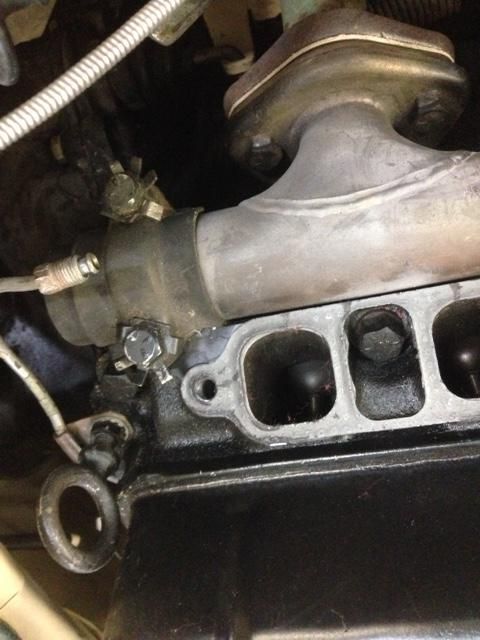
Had another set back. I was dealing with the intake manifold leak, and tried to reseal the gasket. I took it off, and promptly broke off the brass 3 way vent line connector. When I got the manifold off, it was clear that it was seating on the upper part of the gaskets, but not on the lower parts. You could see the leakage stains. I cleaned the surfaces and installed new gaskets. While mounting the manifold, I made a serious error. I tightened the lower two mounting nuts first. When I moved up to the top, I started with the center right. The tang promptly snapped off. That was Weds. I put down my wrench and walked away. Yesterday I returned to it and found that if the bottom nuts were tight, there was a 1/4" gap between the manifold and the gasket surface. I'll follow the book when my replacement manifold and brass connector arrives (thanks to Fil), but will seat the upper surface first, and make sure the lower part of the gasket is sealed to the head and manifold.
If nothing else, I'm learning a lot about the vehicles I drove around in for so many years! Gives me a greater appreciation for my former motor sergeants and wheeled vehicle mechanics!!!!
If nothing else, I'm learning a lot about the vehicles I drove around in for so many years! Gives me a greater appreciation for my former motor sergeants and wheeled vehicle mechanics!!!!
Vin Zike
-
Vzike
- Sergeant Major of the "G"
- Posts: 729
- Joined: December 27th, 2013, 4:05 pm
- Location: Jupiter, Florida
Re: '77 A2 - My first project
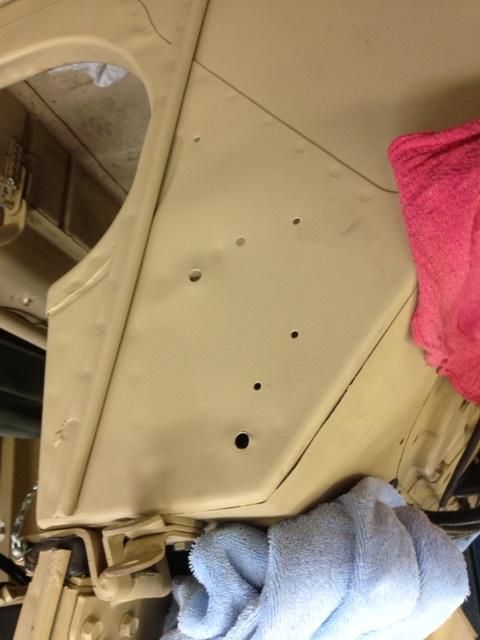
I filled dozens of holes in the back end of this MUTT, since it was configured as a radio jeep by someone who did not know how to do it right. Seriously, so many holes!!! Homemade mounting brackets all over the back.
In my zeal to get it done, I over looked a few forward of the drivers side. Does anyone have any idea what they are for?
Fil said the two larger 3/8" holes, forward of the door bead are for a heater component. No heaters needed here in Florida, so those wont be used. How about the other four smaller holes? Also, there are two holes on the the drivers side fender. Any ideas?
Vin Zike
Re: '77 A2 - My first project
On the intake mounting, a couple of things. The bolts are not tightened very much, be sure to look at the tightening specs. Al;so be aware that if you have the old style head which it looks like you do and you use an exhaust gasket you are going to have problems.
1964 M151A1
1984 M1008
1967 M416
04/1952 M100
12/1952 M100- Departed
AN/TSQ-114A Trailblazer- Gone
1984 M1008
1967 M416
04/1952 M100
12/1952 M100- Departed
AN/TSQ-114A Trailblazer- Gone
-
Jay Mallari

- 1st Lieutenant

- Posts: 931
- Joined: December 7th, 2007, 10:30 pm
- Location: Middlesex, England
Re: '77 A2 - My first project
Actually, the two 3/8" holes are for the fording intake tube and the two holes in the fender are for the fording intake tube clamp.
The other pair of small holes is for a circuit breaker and I think the other pair is for the heater resistor.
The other pair of small holes is for a circuit breaker and I think the other pair is for the heater resistor.
Re: '77 A2 - My first project
I am not so sure about the fording clamps. That is too far out on the fender for that. The old style head has the small boss's for the manifold bolts on the head. If the exhaust manifold is a snug fit without a gasket then it is supposed to be used without a gasket and just graphite grease. I use red silicone. With a lot of the exhaust gaskets it is a good idea to double up on the intake gaskets and use aviation cement on them. Just a very thin layer. Watch that torque, the end bolts are less than the center but they are all less than you would think.
1964 M151A1
1984 M1008
1967 M416
04/1952 M100
12/1952 M100- Departed
AN/TSQ-114A Trailblazer- Gone
1984 M1008
1967 M416
04/1952 M100
12/1952 M100- Departed
AN/TSQ-114A Trailblazer- Gone
-
Jay Mallari
- 1st Lieutenant
- Posts: 931
- Joined: December 7th, 2007, 10:30 pm
- Location: Middlesex, England
Re: '77 A2 - My first project
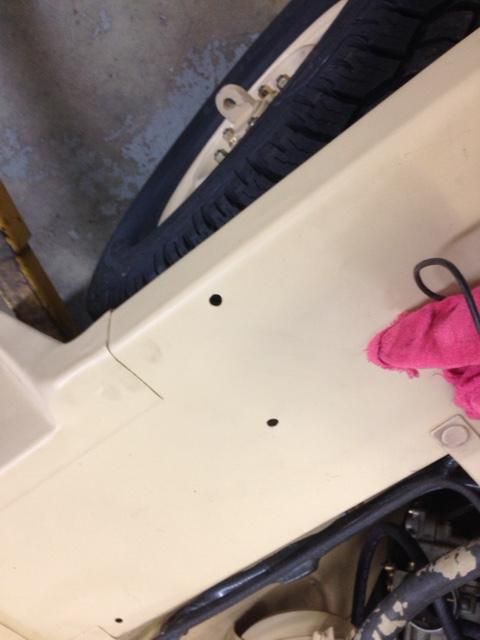
Pic of the clamp. As a side note, this one has a data plate on the drivers side rear fender.

-
Vzike
- Sergeant Major of the "G"
- Posts: 729
- Joined: December 27th, 2013, 4:05 pm
- Location: Jupiter, Florida
Re: '77 A2 - My first project
Jay, Thank you for that picture. It says it all. Both the fender holes and the cowling holes are right where both brackets would be. The body for mine was originally a USMC body, and has the dash holes to suggest it had a fording kit installed. I do not plan to put the fording kit on, but will leave the holes, maybe cap plugging them.
Vin Zike