1978 M151A2 From the Royal Saudi Army (KSA)

A place to post pics and descriptions of ongoing restoration projects

Moderators: rickf, raymond, Mr. Recovery

User avatar
Vzike
Sergeant Major of the "G"
Posts: 729
Joined: December 27th, 2013, 4:05 pm
Location: Jupiter, Florida

Re: 1978 M151A2 From the Royal Saudi Army (KSA)

Unread post by Vzike » December 13th, 2016, 11:28 am

Got the A2 back from the sand blaster yesterday. Taking it down to "white metal" sure exposes everything.

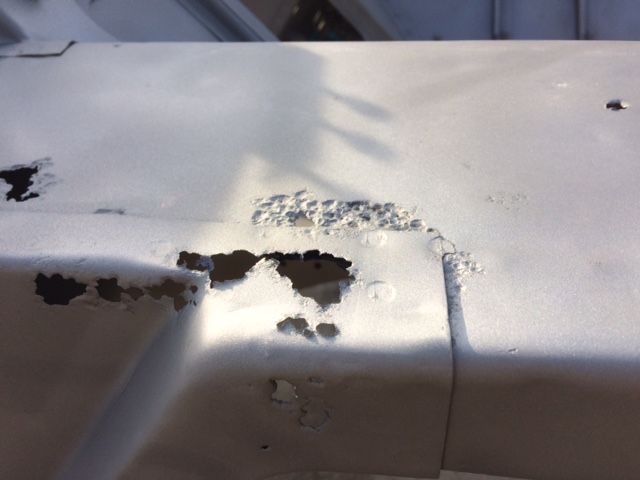
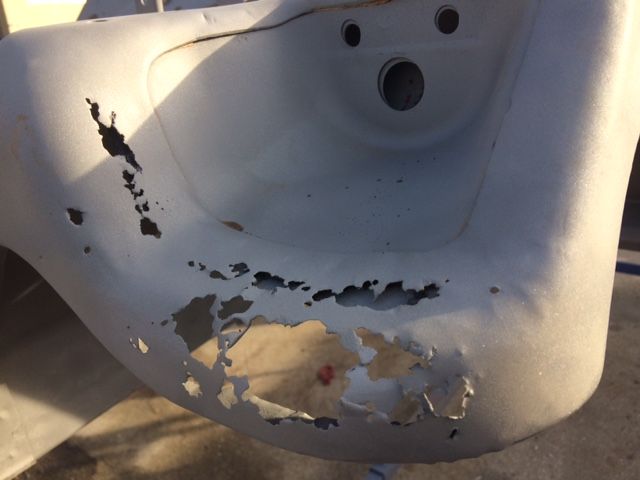
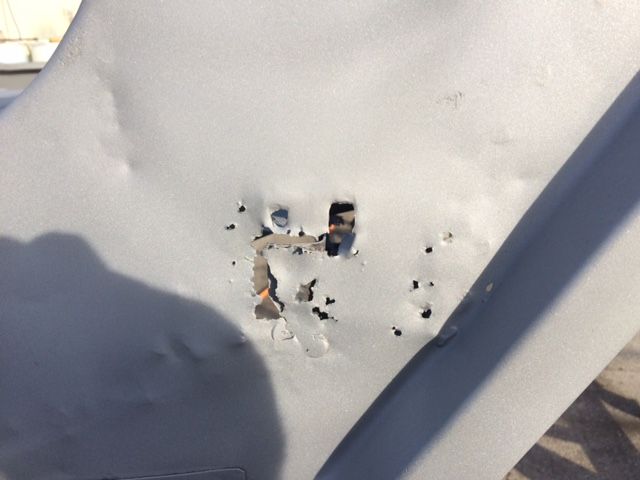
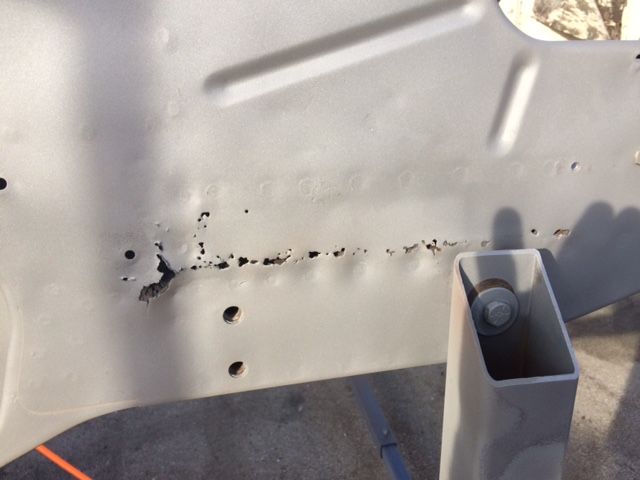
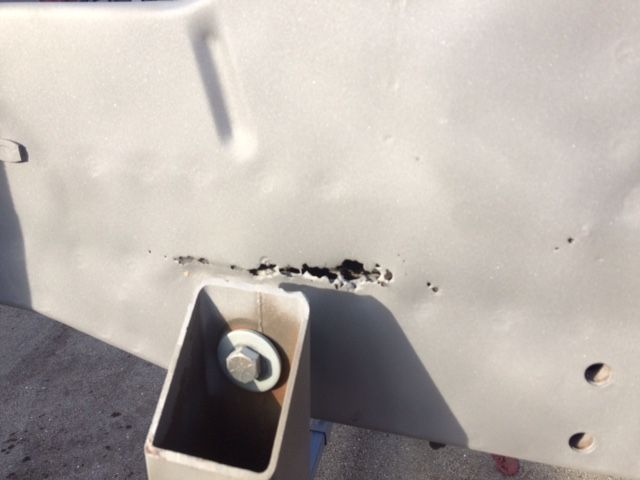
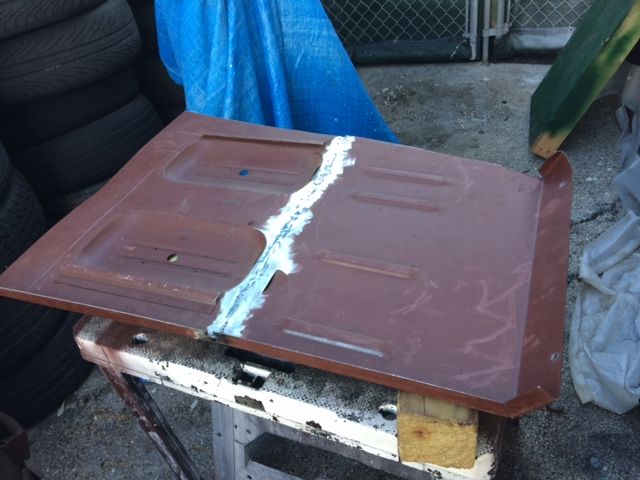
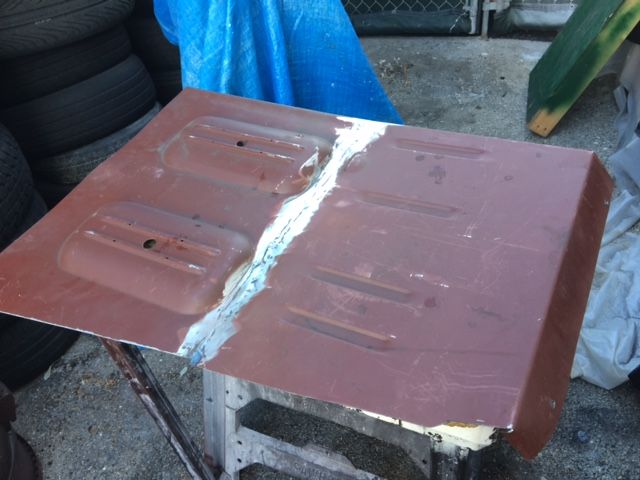
The following pictures are not for the weak of heart...... This is ugly....

Image

Image

Image

Image

Image

Image

Image

Image

Image

Image

Image

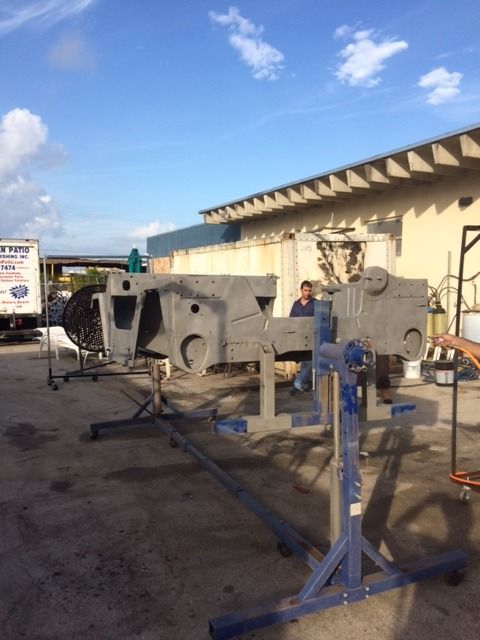
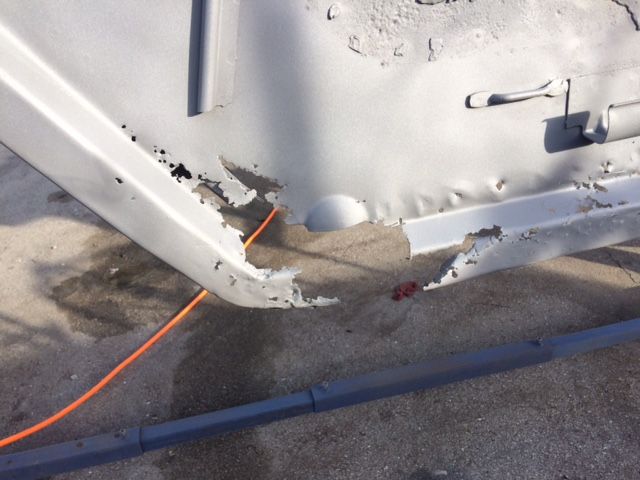
Now a think a bit of primer is needed!!!!
Vin Zike

User avatar
rickf
General
General
Posts: 19764
Joined: November 26th, 2007, 1:28 pm
Location: Pemberton, NJ.

Re: 1978 M151A2 From the Royal Saudi Army (KSA)

Unread post by rickf » December 13th, 2016, 7:26 pm

Your blaster does an exceptional job, what type of media does he use? Those rear cross member and spring pocket areas are going to be a problem since they are both structural, be very careful around those areas. It is interesting were some of that rust is like the tunnel area. But there is the body tag clear as day! Hope you got the info before it was blasted off. You should have removed the tag before blasting.
1964 M151A1
1984 M1008
1967 M416
04/1952 M100
12/1952 M100- Departed
AN/TSQ-114A Trailblazer- Gone

Fil Bonica
Brigadier General
Brigadier General
Posts: 2607
Joined: December 9th, 2007, 10:49 am
Location: ~ Heaven ~

Re: 1978 M151A2 From the Royal Saudi Army (KSA)

Unread post by Fil Bonica » December 13th, 2016, 7:47 pm

UGH!!!!!

Fil Bonica
K1ABW

lpcoating
Brigadier General
Brigadier General
Posts: 2030
Joined: February 19th, 2013, 11:38 pm
Location: Mansfield, PA
Contact:

Re: 1978 M151A2 From the Royal Saudi Army (KSA)

Unread post by lpcoating » December 13th, 2016, 9:31 pm

Hey Vin! I like! Parts in stock...

Guy
M151 Body Panels - http://www.m151bodypanels.com/

'68 A1 - Under full resto

User avatar
Vzike
Sergeant Major of the "G"
Posts: 729
Joined: December 27th, 2013, 4:05 pm
Location: Jupiter, Florida

Re: 1978 M151A2 From the Royal Saudi Army (KSA)

Unread post by Vzike » December 14th, 2016, 9:56 am

Actually, Guy..... I already have side panels and floors from you for this vehicle. And.... after reading a post you put on facebook, I switched to .023 wire and adjusted the feed and power on the mig welder. It was a miracle!!!!!! I'm looking forward to welding on it now.

I'll be working on the spring pockets and frame members in the back. As Rick pointed out, the rust in the back area is interesting. Some areas have no rust others have bad rust through. I'm not sure I have a good reason for it, but look at the pictures of the fender sheet metal. Some area show NO pitting at all, yet there is a complete hole next to it. The area in the back is much the same. I can cut out those areas and weld in patches. There is good solid metal around those areas.

The underbody kit fits up perfectly. The rear cross member required some adjustment.

Got in the battery tray from Fil, yesterday. Thank you. That got here quickly.

And now, just for your viewing pleasure.... and since I have no new pics of this mutt to show you, here are two pictures I took at the garage yesterday. First is the1964 Kaiser M151 mentioned in a different thread... (can you see it behind that red glare?), and my 1970 AMG M151 A2 (behind that silver thingamabob). That will be my project after I finish the current A2.


Image

Image
Vin Zike

User avatar
rickf
General
General
Posts: 19764
Joined: November 26th, 2007, 1:28 pm
Location: Pemberton, NJ.

Re: 1978 M151A2 From the Royal Saudi Army (KSA)

Unread post by rickf » December 14th, 2016, 11:18 am

I'd rather have the Delorean than the Ferrari. I used to have to work on all of the exotics when I worked at a place in a neighborhood where all of the local Philadelphia sports players lived. Sure was fun at test drive time though. :roll: :mrgreen: Look up a Jenson Interceptor, one of my customers had a 71 Interceptor with a 440 in it. Had Jenson aluminum valve covers on it but it was a bonafide Chrysler 440 out of a Challenger. You want to talk about fast and squirrely!!!!! Man that car was fun. The owner was scared to drive it above 30 MPH but loved to have me take him out in it and go flat out. I love those kind of customers. :D
1964 M151A1
1984 M1008
1967 M416
04/1952 M100
12/1952 M100- Departed
AN/TSQ-114A Trailblazer- Gone

User avatar
Vzike
Sergeant Major of the "G"
Posts: 729
Joined: December 27th, 2013, 4:05 pm
Location: Jupiter, Florida

Re: 1978 M151A2 From the Royal Saudi Army (KSA)

Unread post by Vzike » December 14th, 2016, 11:38 am

I hear you, Rick. This Delorean is not one you would want, though. It is full of issues. I think it was a junker someone threw back together and sold it to a collector who got caught up in the excitement of buying one below book, only to find it was not worth what he paid.

The Ferrari is worth in the neighborhood of $80k. The Delorean was bought for under $20k. The Delorean is a pain to get in and out of and feels like a coffin looking for a funeral. I don't love it. Not a big fan of the Italian car either, but it is in great shape and drives well.

Back to the mutt body work..........
Vin Zike

User avatar
Vzike
Sergeant Major of the "G"
Posts: 729
Joined: December 27th, 2013, 4:05 pm
Location: Jupiter, Florida

Re: 1978 M151A2 From the Royal Saudi Army (KSA)

Unread post by Vzike » December 18th, 2016, 11:08 am

My welding leaves a lot to be desired, but I am learning.

The way the rust attached this truck is all inside the the overlaps that were spot welded. Here are some before and after pics...

First is the the area where the rear cross member attaches to the side. With the exception of the overlap areas, the side sheet metal is solid. I cut out the rust and welded in a patch. This gives me new solid metal to attache the underbody rear crossmember.

Image
After
Image

The next series shows how I'm in the process of fixing the forward part of the drivers side.
Before
Image
Image
installing patches
Image
Image
Image

I'll add the finished pictures after weld and suffer the remarks of how bad I weld!
Vin Zike

User avatar
m3a1
Lt. General
Lt. General
Posts: 4039
Joined: August 7th, 2014, 6:36 pm

Re: 1978 M151A2 From the Royal Saudi Army (KSA)

Unread post by m3a1 » December 18th, 2016, 12:14 pm

I'm curious about something and perhaps you and Guy might have an answer. If one were going to remove whole panels on a project such as this, what would be the best way to go about it? I'm just guessing but, would the order of march be to restore the subframe components first, then ensure the subframe was true and then anchor the subframe to a heavier construct to ensure it remained true during other restorative efforts, before removing and replacing whole panels?

I'd take a good, hard look inside those subframe tubes before committing to doing anything to the outside because I'm guessing there are more nightmarish surprises inside.

Every time I see stuff like this, I'm happy to have the Alley Cat on my project list. Life is so much easier with heavier gauge metal.

Cheers,
TJ

User avatar
rickf
General
General
Posts: 19764
Joined: November 26th, 2007, 1:28 pm
Location: Pemberton, NJ.

Re: 1978 M151A2 From the Royal Saudi Army (KSA)

Unread post by rickf » December 18th, 2016, 1:10 pm

M3a1, you hit the nail on the head. You always want to be sure the main structure is straight first. This is of particular issue with cut and weld mutts.

Vin, Why are you not just replacing whole panels? Would be much easier and cleaner. Plus all of those welds will eventually rust through in the future where the metal adjacent to the weld has crystallized. One thing to consider with welding sheet metal is that the metal directly next to the weld will be susceptible to cracking if it is in an area of any stress or movement so you want to keep the welds to a minimum on a unibody. A unibody is one big stressed member.
1964 M151A1
1984 M1008
1967 M416
04/1952 M100
12/1952 M100- Departed
AN/TSQ-114A Trailblazer- Gone

User avatar
Vzike
Sergeant Major of the "G"
Posts: 729
Joined: December 27th, 2013, 4:05 pm
Location: Jupiter, Florida

Re: 1978 M151A2 From the Royal Saudi Army (KSA)

Unread post by Vzike » December 18th, 2016, 1:42 pm

TJ,

I can't respond as an expert. I'm learning as I go. I'm an engineer by education. I've worked in the nuclear and aircraft industries, but an engineer cannot get too hands on without a union steward writing his name down. 30 years wearing a green beret did not give me much hands on vehicle experience either. I pretty much always had a motor sergeant who could fix anything, anytime, anywhere, with nothing. I'm appreciating those skills now that I'm under the hood.

I've restored three of these to date, and all were different. This one, however, had totally missing frame cross members. I was lucky enough to have a complete underbody kit I got on eBay a few years ago, new floors, side panels & seat supports from Guy, a new battery floor from Fil, and two unusable fuel tanks.

First off, my good friend, Fil, suggested that I stop, tuck, and roll. Try to find a better body. Since I have the stuff and the time, and that this body has a clean Florida title, I opted to jump in and resurrect this mutt.

Here is my approach.... First I checked the main frame from engine to back. It was solid with no rust throughs or significant issues. Then, using a sharp (you will need to keep sharpening it) air chisel, I slowly cut out the damaged/rusted out frame and support members, in accordance with the instructions with the kit. Of course, I also cut out the floors all the way back to the rear floor. With the air chisel, you can slide between the panels, and with some amount of learning curve, cut the spot welds out.

Once done, I measured out corners and verified that what I had left was true and square. Leaving the side panels and all other panels intact, I sent the tub to the sand blaster. Of course, when it came back, the total extent of the rust damage was very apparent. Still, the two main frame members were solid and straight. I put the tub on the rotisserie, and primed it.

Next, I flipped it on its back, and started fitting up the underbody repair kit. Some parts have to be modified. I repaired the spring pockets and a couple other obvious places in the back. As I fit in a frame part, I used self tapping screws to secure it in place. By the way, I also sandblasted and primed the underbody kit parts and the floor pieces.

After fitting up the underbody kit and securing it with the screws (only a half dozen screw holds it firmly where it goes), I fit up the drivers floor. Secured the seat support, and took a fuel tank bottom and fit it in place. This takes a lot of smoozing. I first attached the back, tacking it in place, and then fitting the sides, bending and metal forming it to reach the frame and side panel. If the side panels need replacing, you need to do that first. Then attached the fuel tank floor to the side panel. At every step, and at every tack weld, I put the fuel tank in place and the seat, to make sure everything was fitting and matching.

Now, instead of welding the driver side all up, I opted to repair the damage to the lower side panel first. Thats where I left this off.

Once that side panel is repaired, I'll switch over to the passenger side, and follow the same process. After all the frame and floors are fit up and attached with the sheet metal screws, I'll remove the floors and weld up the frame. Then reinstall the floors, and weld them in place (checking and double checking the fuel tank, seats, battery cover and tool box lids for correct fit).

I'll then fit and weld in the seat supports and tool box lid support and lid. By the way, if you replace the seat supports with new ones from Guy, make sure you save them. You'll need the seat mounting brackets for the new supports.

What have I missed?
Vin Zike

User avatar
Vzike
Sergeant Major of the "G"
Posts: 729
Joined: December 27th, 2013, 4:05 pm
Location: Jupiter, Florida

Re: 1978 M151A2 From the Royal Saudi Army (KSA)

Unread post by Vzike » December 18th, 2016, 1:53 pm

rickf wrote:M3a1, you hit the nail on the head. You always want to be sure the main structure is straight first. This is of particular issue with cut and weld mutts.

Vin, Why are you not just replacing whole panels? Would be much easier and cleaner. Plus all of those welds will eventually rust through in the future where the metal adjacent to the weld has crystallized. One thing to consider with welding sheet metal is that the metal directly next to the weld will be susceptible to cracking if it is in an area of any stress or movement so you want to keep the welds to a minimum on a unibody. A unibody is one big stressed member.
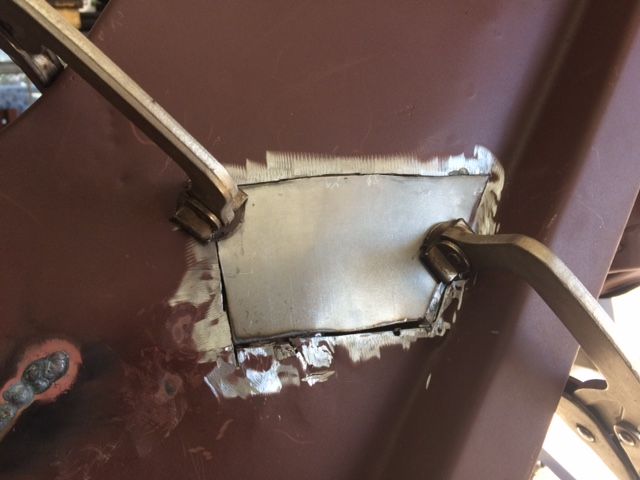
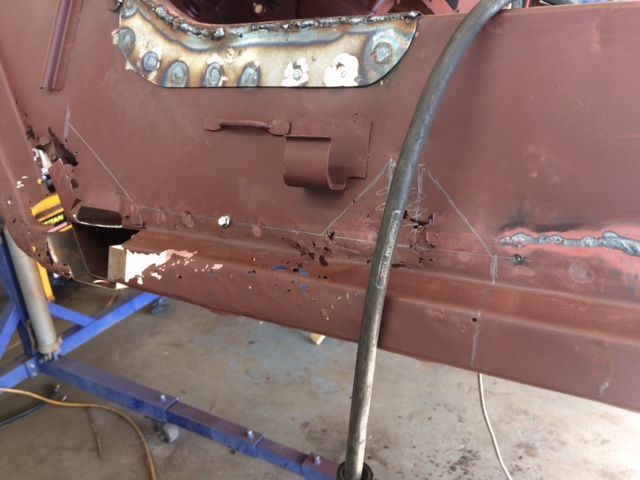
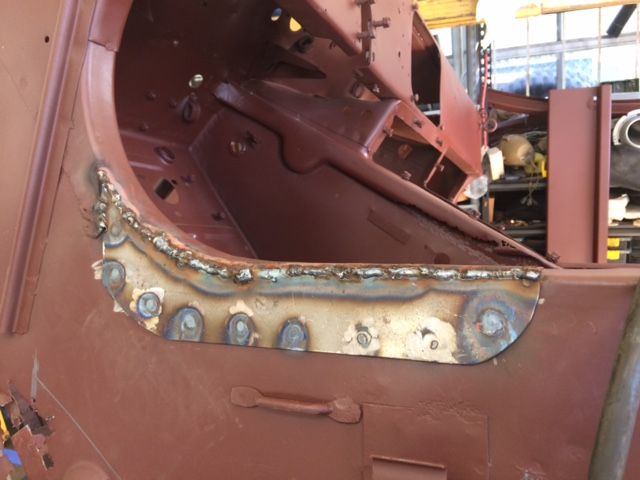
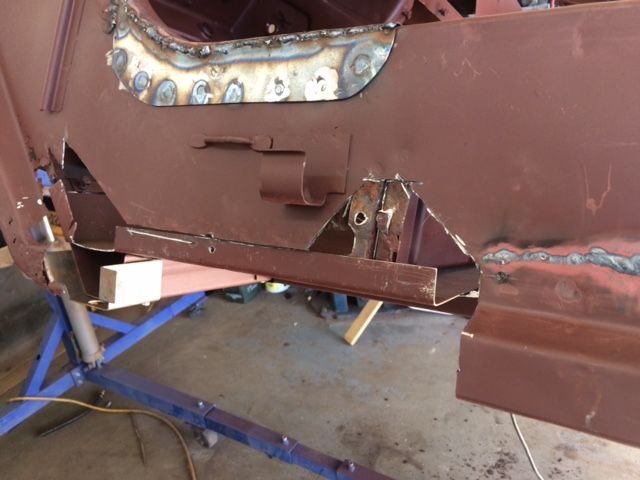
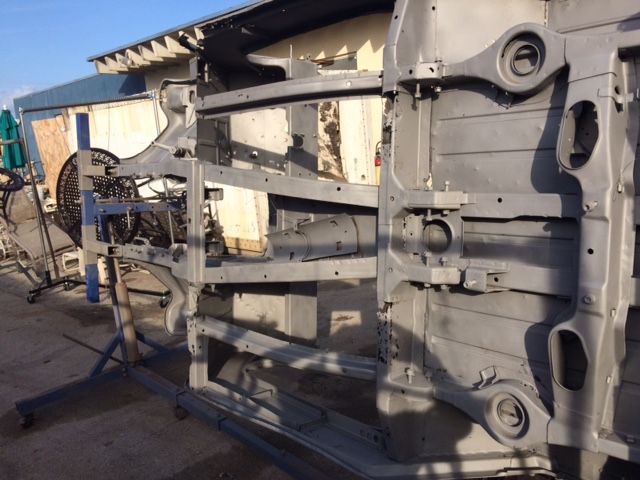
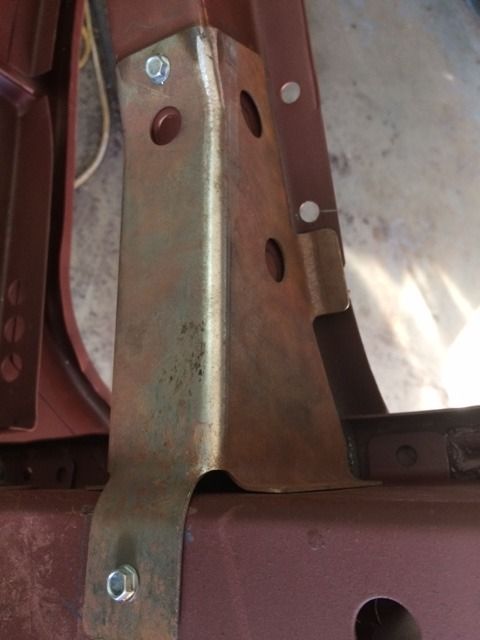
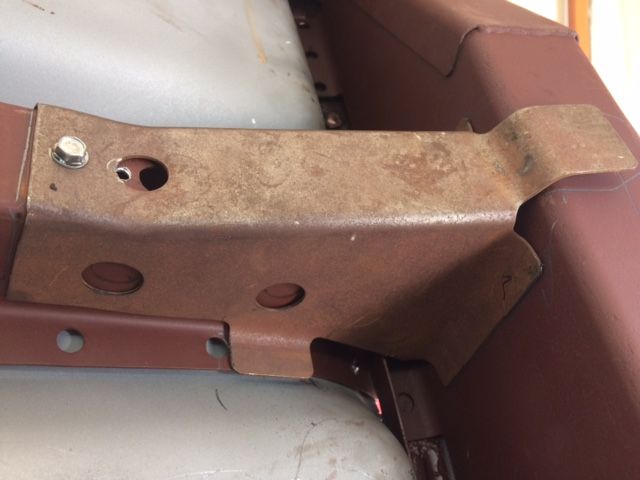
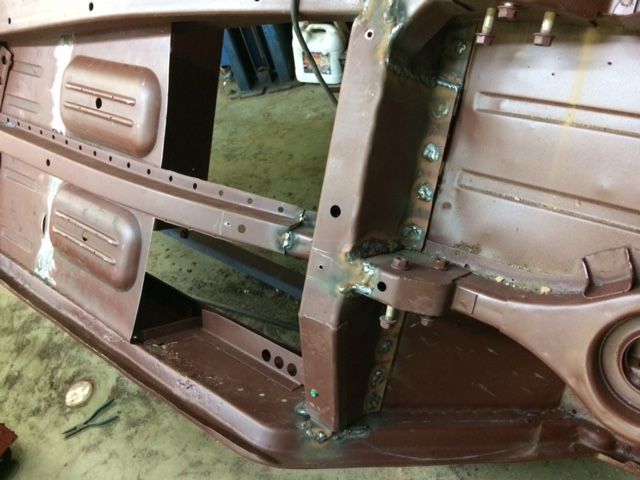
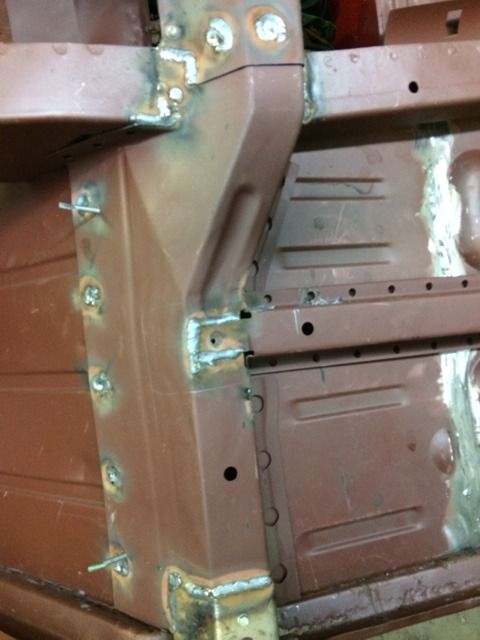
I don't have a good answer for that, Rick. The side panels only go so far forward. I need to piece that together anyway. The back was pretty good and straight, so I opted to patch it. I thought about annealing the welds but not doing that at this point. I also think that when you cut out the whole side, you end up with two welds front and back, and a bunch of small welds between. All the seat divider brackets have to be replaced, the tool mounts, & the footman loops. The forward lower part of that curved front entry way on is a pain to open up without destroying it. (but then that was destroyed on mine already). Also, I need a piece for the other side, and there is enough left of the drivers side to do the other side.

This is not going to be a vehicle for off road mudding, but it will look great in parades.
Vin Zike

Fil Bonica
Brigadier General
Brigadier General
Posts: 2607
Joined: December 9th, 2007, 10:49 am
Location: ~ Heaven ~

Re: 1978 M151A2 From the Royal Saudi Army (KSA)

Unread post by Fil Bonica » December 18th, 2016, 5:14 pm

Another "silk purse out of a sows ear"!
I'll be down there soldier for an onsite inspection!
Be Ready!

Fil Bonica
K1ABW

User avatar
Vzike
Sergeant Major of the "G"
Posts: 729
Joined: December 27th, 2013, 4:05 pm
Location: Jupiter, Florida

Re: 1978 M151A2 From the Royal Saudi Army (KSA)

Unread post by Vzike » December 21st, 2016, 9:13 am

Got started on the frame and floor repairs this week. Got most of the frame members and bad sheet metal cut out last week.

I read the underbody repair kit instructions (thank you, Fil), and prepared the body as described.

The frame parts have to be in place before the floors, but all needs to fit before any welding can be done. I started with the front cross members, and worked back. The rear cross member has to be modified for the A2.

I used self taping screws to secure the frame and floor pieces for the fit up.

Here are the pictures:

Image

Image

Image

Image

I fit the floors after attaching the frame members. Then welded the floor sections together, and fit them again:

Image

Image

Image

Image

The frame is pretty much welded in now and is very solid. Today I'll put the tie pieces in, then start welding the floors in place.
Vin Zike

User avatar
Vzike
Sergeant Major of the "G"
Posts: 729
Joined: December 27th, 2013, 4:05 pm
Location: Jupiter, Florida

Re: 1978 M151A2 From the Royal Saudi Army (KSA)

Unread post by Vzike » December 21st, 2016, 9:25 am

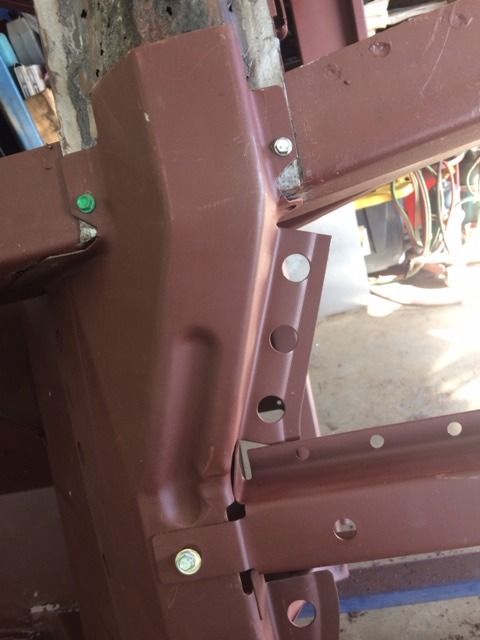
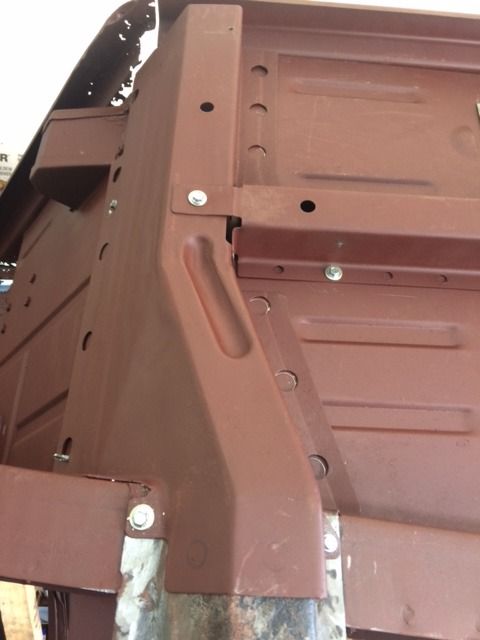
m3a1 wrote:I'm curious about something and perhaps you and Guy might have an answer. If one were going to remove whole panels on a project such as this, what would be the best way to go about it? I'm just guessing but, would the order of march be to restore the subframe components first, then ensure the subframe was true and then anchor the subframe to a heavier construct to ensure it remained true during other restorative efforts, before removing and replacing whole panels?

TJ, I believe the front to rear two center frame pieces are the key to the entire frame. The underbody kit instructions sat to cut away all the pieces to be repaired with the ket.It shows the cross members, and the two pieces that run under the center of the floors. It would be really hard to do that without cutting out the floors. In this case, the floors were a mess, so I just used an air chisel and cut them out. I also used the air chisel to cut out most of the frame spot welds. I then took a die grinder and cleaned up anything left proud that would affect the replacement pieces. Since this was on the rotisserie, I was able to rotate it and check dimensions to make sure the side panels and attachment points were still reasonably square.

So, in this case, and I believe it will work for most repairs like this, I cut away all the floor panels and the sub frame parts before starting to put anything back together. The last two that I did required just the floors to be replaced. In that case, I carefully cut out the floor spot welds, then prepped and fit the floors back to the existing cross sub frame.
Vin Zike

Post Reply