1978 M151A2 From the Royal Saudi Army (KSA)
Moderators: rickf, raymond, Mr. Recovery


Re: 1978 M151A2 From the Royal Saudi Army (KSA)
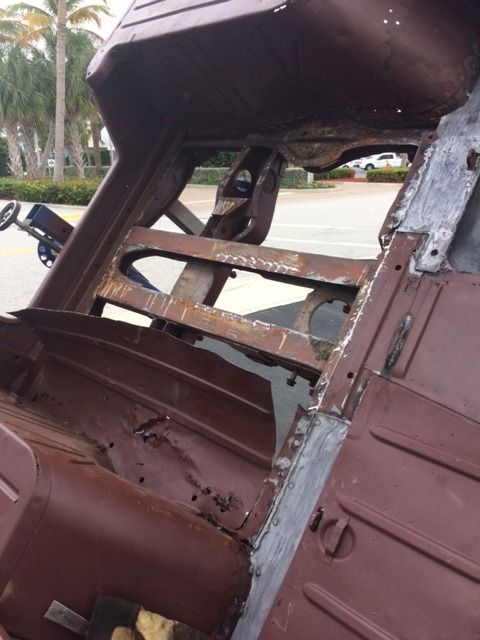
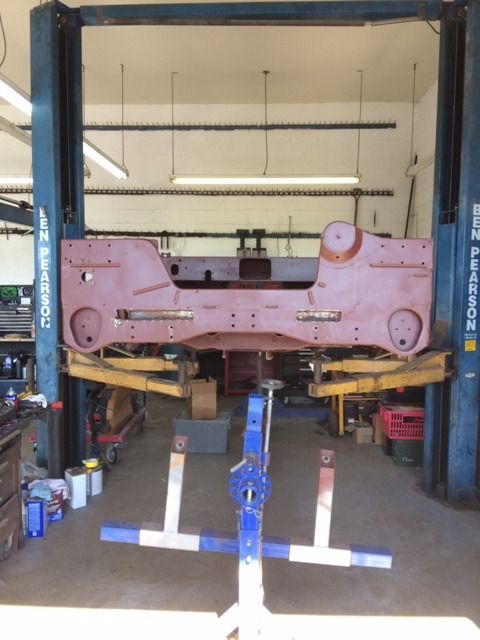
As long as the two main rails down the center are solid and have not been cut then the structure should remain straight as long as it was not rolled and bent beforehand. The place it gets dicey is in the back at the rear cross member of that is rotted out since that is the main support to hold the center rails in alignment in the back. You do have a lot of body back there but most of these have been pretty well bent up in the rear so you can't trust the body for straightness. Your welds look much better than before. I am not there so it is impossible to tell but I would bet a little faster travel over the weld and you will be perfect. Penetration looks 100% better than before.
1964 M151A1
1984 M1008
1967 M416
04/1952 M100
12/1952 M100- Departed
AN/TSQ-114A Trailblazer- Gone
1984 M1008
1967 M416
04/1952 M100
12/1952 M100- Departed
AN/TSQ-114A Trailblazer- Gone
-
Vzike

- Sergeant Major of the "G"

- Posts: 729
- Joined: December 27th, 2013, 4:05 pm
- Location: Jupiter, Florida
Re: 1978 M151A2 From the Royal Saudi Army (KSA)
Thank you, Rick. I'm not happy with my welds yet. I envy good welders. I went back to .035 wire for the heavier underbody work, but am using .023 wire for the sheet work. I think lighting in the shop is an issue. I need to get my overheads fixed. I've realized watching the wire is critical to keeping the puddle moving correctly. I still get blowouts when I hit a spot that has rust issues on the other side.
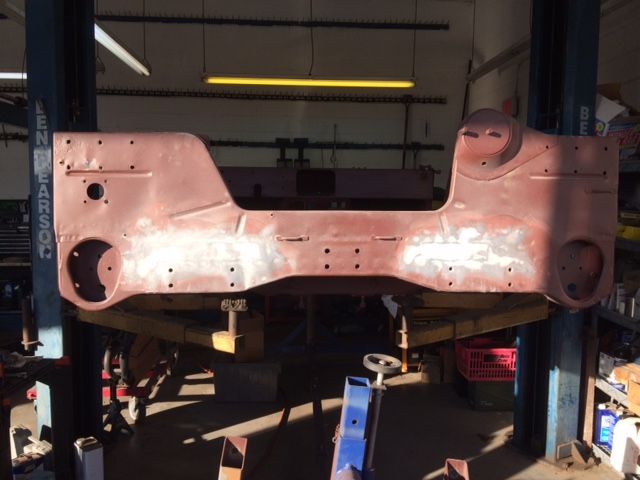
The two main rails on this mutt are nice and straight. The back area is intact and straight. It really is coming out very solid and straight. This should end up being a good vehicle. I just have too much money in it.
The two main rails on this mutt are nice and straight. The back area is intact and straight. It really is coming out very solid and straight. This should end up being a good vehicle. I just have too much money in it.
Vin Zike
Re: 1978 M151A2 From the Royal Saudi Army (KSA)
There is no stopping a blowout when you hit rust, that is just part of welding. You can weld that frame with the 023 with no problem, just crank up the wire speed a bit and slowly bring up the heat until you get the right sound. You can crank up the heat and then bring up the wire speed, it is personal preference.
1964 M151A1
1984 M1008
1967 M416
04/1952 M100
12/1952 M100- Departed
AN/TSQ-114A Trailblazer- Gone
1984 M1008
1967 M416
04/1952 M100
12/1952 M100- Departed
AN/TSQ-114A Trailblazer- Gone
-
Vzike
- Sergeant Major of the "G"
- Posts: 729
- Joined: December 27th, 2013, 4:05 pm
- Location: Jupiter, Florida
Re: 1978 M151A2 From the Royal Saudi Army (KSA)
Went back to the .023 wire, cranked the power down to A (lowest level), and slowed the speed to 3. It was a miracle........ sizzling bacon!!!!
Thank you!!!
Thank you!!!

Re: 1978 M151A2 From the Royal Saudi Army (KSA)
Should be the site's catchphrase.Vzike wrote: I just have too much money in it.
1960 M151 Run #1
"There is one nut on a M151 that is very difficult to remove....." - K8icu
"She ain't a Cadillac and she ain't a Rolls, But there ain't nothin' wrong with the radio" - Aaron Tippin

"There is one nut on a M151 that is very difficult to remove....." - K8icu
"She ain't a Cadillac and she ain't a Rolls, But there ain't nothin' wrong with the radio" - Aaron Tippin
Re: 1978 M151A2 From the Royal Saudi Army (KSA)
There you go, now adjust your travel speed as needed and you should be able to eliminate a lot of grinding.Vzike wrote:Went back to the .023 wire, cranked the power down to A (lowest level), and slowed the speed to 3. It was a miracle........ sizzling bacon!!!!
Thank you!!!
1964 M151A1
1984 M1008
1967 M416
04/1952 M100
12/1952 M100- Departed
AN/TSQ-114A Trailblazer- Gone
1984 M1008
1967 M416
04/1952 M100
12/1952 M100- Departed
AN/TSQ-114A Trailblazer- Gone
-
Vzike
- Sergeant Major of the "G"
- Posts: 729
- Joined: December 27th, 2013, 4:05 pm
- Location: Jupiter, Florida
Re: 1978 M151A2 From the Royal Saudi Army (KSA)
My last day of welding for the week. Got all the seams of the underbody kit complete. Welds are progressively getting better as I improve my technique.
I have a lot of family things to do now. Judy and I are heading up to Newark tonight. Rental car from there to CT to see my daughter and grand daughter. Christmas eve Morning we'll drive to Port Jervis NY, then to Judy's fathers house in PA, then later that night to Christmas festivities at her Uncles house in NJ. Then back to her fathers in PA, for the night and Christmas. Monday we'll hop a plane back to the sun and a whole week of family fun here. Last count is 35 people showing up. I doubt I'll get much done on the mutt until the New Year.
Now is the time to express my appreciation to all who have helped, prodded, advised, and enjoyed this adventure into the world of the M151. This is a great site, and y'all are patriots. Thanks to all, and I hope all of you have the happiest of Holidays, and may the new year bring good things to all.
Vin Zike
Re: 1978 M151A2 From the Royal Saudi Army (KSA)
NJ, You are getting close to me. At least it is not forecast to be anywhere near as cold as it was last week.
1964 M151A1
1984 M1008
1967 M416
04/1952 M100
12/1952 M100- Departed
AN/TSQ-114A Trailblazer- Gone
1984 M1008
1967 M416
04/1952 M100
12/1952 M100- Departed
AN/TSQ-114A Trailblazer- Gone
-
halftracknut
- Brigadier General

- Posts: 2071
- Joined: December 11th, 2007, 2:28 pm
Re: 1978 M151A2 From the Royal Saudi Army (KSA)
A good compromise might be .030 wire...your work looks good...these jeeps sure are fun to work on...
slowest mutt east of the missippi..
-
lpcoating
- Brigadier General
- Posts: 2037
- Joined: February 19th, 2013, 11:38 pm
- Location: Mansfield, PA
- Contact:
Re: 1978 M151A2 From the Royal Saudi Army (KSA)
When welding on thin sheet metal you have to know how to "read" the weld puddle. When it gets to hot you will see it sink right before you blow through. This is where stich welding - let off trigger just long enough for puddle to solidify then back on comes into play. Another trick is to extend the distance between the tip and weld puddle. This will run a little cooler however if you get to far away you'll have porosity issues from lack of proper shielding gas coverage. This is where scrap metal makes for good practice.
Guy
Guy
M151 Body Panels - http://www.m151bodypanels.com/
'68 A1 - Under full resto
'68 A1 - Under full resto
-
Vzike
- Sergeant Major of the "G"
- Posts: 729
- Joined: December 27th, 2013, 4:05 pm
- Location: Jupiter, Florida
Re: 1978 M151A2 From the Royal Saudi Army (KSA)
Took a bit of time off over the holidays to get married. Any woman who is good with her man owning 5 MUTTs and a storage bay full of parts is a keeper in my book.
So, I have someone expressing serious interest in this project, even before it is ready to reassemble. After careful consideration, and seeing how solid the rest of the body is coming together, I decided to replace the back floor. I just ordered one from CMD. This will be the second one I've replaced.
In case any of you were thinking of changing out one. It's a lot easier than you might think
Removing the old one is very simple. Use a sharp air chisel, and a good 4 inch cut off wheel. You'll also need a side grinder for cleanup.
First I cut through the MIG welds at the front of the panel and the back. Make sure you only cut the depth of the panel.
Then, to make removal easy, cut through the panel in three places, between the frame members running from front to rear.
Next, using the air chisel, carefully cut the front seam. Once that is done, peel pack the center piece, cutting the spot welds with the air chisel. Make sure the angle of the chisel is facing the panel to minimize material left on the frame. As the welds are cut, peal back the center piece and keep going until you can remove the center piece.
Next, I used the air chisel to cut the sites of the panel where it curves up. After that, I pealed back the outside panels, one at a time, while cutting the spot welds, until I could pull off the panel.
Then I went along each side, cutting out the spot welds of the flange, until both side flanges could be removed.
Finally, I took my side grinder and cleaned up the spot welds and ground down the remaining bumps of the MIG weld.
Start to finish: 1-1/2 hours
Vin Zike
-
Vzike
- Sergeant Major of the "G"
- Posts: 729
- Joined: December 27th, 2013, 4:05 pm
- Location: Jupiter, Florida
Re: 1978 M151A2 From the Royal Saudi Army (KSA)
There were two areas (typical) of rust through on the rear panel. I really did not want to open the bag of worms to replace the whole back, so I first opted to cut out the damaged areas to inspect them. I made my cuts just inside the spot welds, so I would have some of the inside frame to support a patch. Once removed, I inspected the surrounding and inside metal for damage. Most appeared to be covered with a lot of surface rust, but no rust through.
With that information, I treated the inside of the frame, as far as I could, to slow down any further rust issues, and cut patches. I welded in the patches, ground down the welds, and put a skip of bondo over them to even it out. Came out very clean and flat.
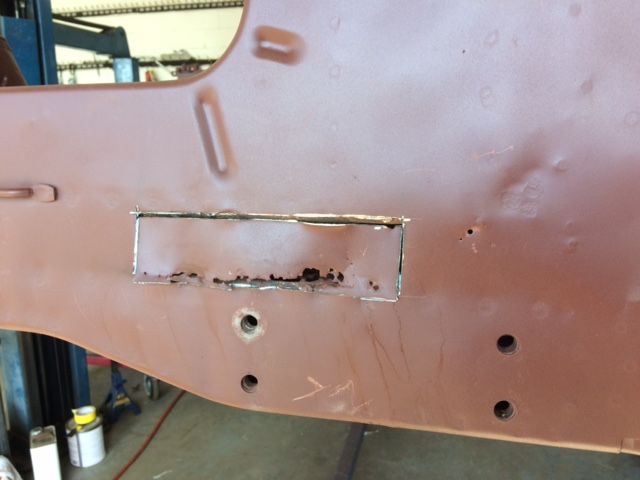
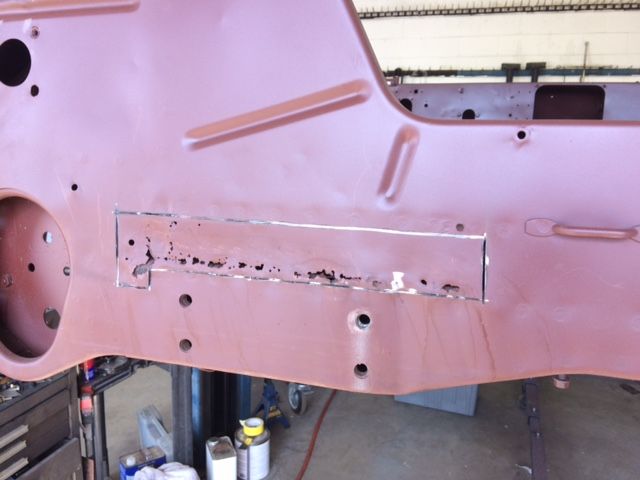
With that information, I treated the inside of the frame, as far as I could, to slow down any further rust issues, and cut patches. I welded in the patches, ground down the welds, and put a skip of bondo over them to even it out. Came out very clean and flat.
Re: 1978 M151A2 From the Royal Saudi Army (KSA)
Aren't there weld nuts on the gas tank strap holes that were cut out in that picture? Can't tell on mine since the screws are broken off in them. Something I will deal with when I do the full resto on mine.
1964 M151A1
1984 M1008
1967 M416
04/1952 M100
12/1952 M100- Departed
AN/TSQ-114A Trailblazer- Gone
1984 M1008
1967 M416
04/1952 M100
12/1952 M100- Departed
AN/TSQ-114A Trailblazer- Gone
-
lpcoating
- Brigadier General
- Posts: 2037
- Joined: February 19th, 2013, 11:38 pm
- Location: Mansfield, PA
- Contact:
Re: 1978 M151A2 From the Royal Saudi Army (KSA)
Can you get some pictures from the underside of the rear cross member?
Guy
Guy
M151 Body Panels - http://www.m151bodypanels.com/
'68 A1 - Under full resto
'68 A1 - Under full resto
-
Vzike
- Sergeant Major of the "G"
- Posts: 729
- Joined: December 27th, 2013, 4:05 pm
- Location: Jupiter, Florida
Re: 1978 M151A2 From the Royal Saudi Army (KSA)
Actually, both of the weld nuts were gone, leaving the oversized holes. I'll drill a hole for the one that was replaced, and just put a nylock nut behind it when I mount the spare tank strap footman loop.Aren't there weld nuts on the gas tank strap holes that were cut out in that picture?
Vin Zike