

Concentrate on the mechanicals, Upstate. There's plenty of time to make it pretty and who knows, another one may come along with a better tub and you'll "be in like Flynn."
Wrench on, brother!
Restoration of an A2 now underway 7/15
Moderators: rickf, raymond, Mr. Recovery

Looking for a Go-By pix of engine compartment for AMG A2
Does anyone have a go-by picture of an early 70's AMG A2, something that shows what its supposed to look like?
This is a shot of what I have.
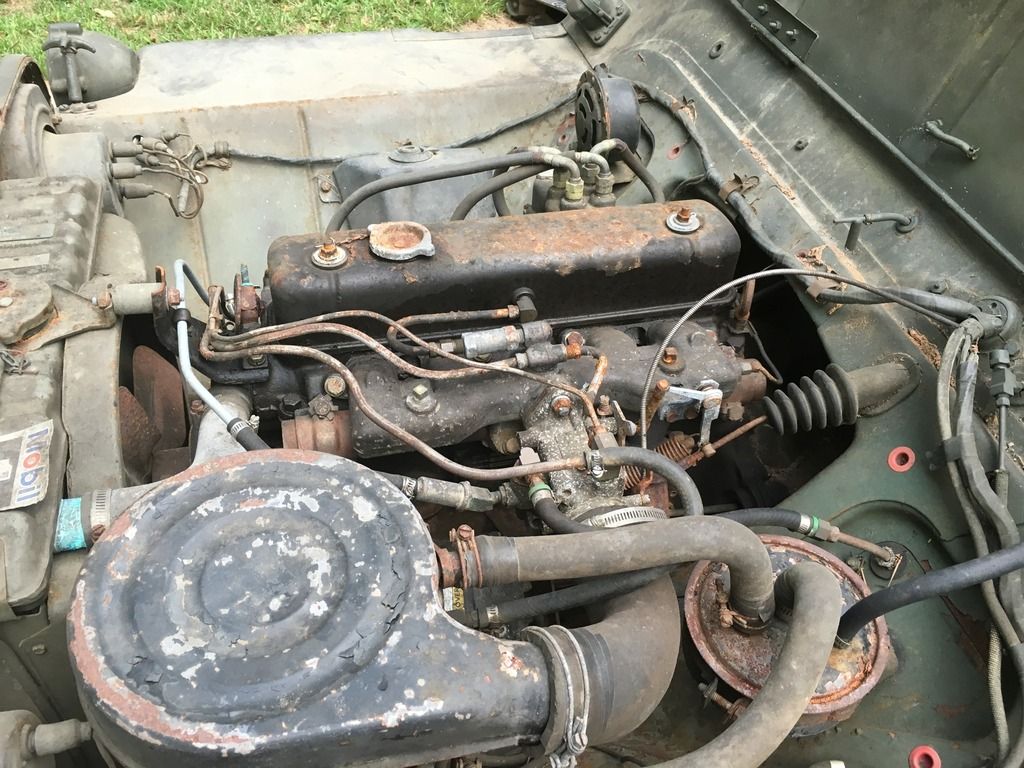
This is a shot of what I have.

Last edited by UpstateSC on November 15th, 2016, 3:45 pm, edited 1 time in total.

Re: Restoration of an A2 now underway 7/15
there we go


Re: Restoration of an A2 now underway 7/15
That looks pretty much correct except for the line to the air cleaner from the other side of the engine. There is supposed to be a line just like that but OI believe it is smaller and goes to a Tee fitting at the air cleaner at that location. And the oil on the hose at the air cleaner makes me wonder if the other end is in the right spot, it is supposed to be the vent for the fuel pump.
1964 M151A1
1984 M1008
1967 M416
04/1952 M100
12/1952 M100- Departed
AN/TSQ-114A Trailblazer- Gone
1984 M1008
1967 M416
04/1952 M100
12/1952 M100- Departed
AN/TSQ-114A Trailblazer- Gone
Re: Restoration of an A2 now underway 7/15
Nother question
See the PCV valve on the top of the valve cover.
is it the correct direction? I thought that valve is a check valve that allows gasses to pass from the valve cover to the intake manifold.
it represents a pretty good vacuum leak if the valve cover isn't air tight.
See the PCV valve on the top of the valve cover.
is it the correct direction? I thought that valve is a check valve that allows gasses to pass from the valve cover to the intake manifold.
it represents a pretty good vacuum leak if the valve cover isn't air tight.
Re: Restoration of an A2 now underway 7/15
1964 M151A1
1984 M1008
1967 M416
04/1952 M100
12/1952 M100- Departed
AN/TSQ-114A Trailblazer- Gone
1984 M1008
1967 M416
04/1952 M100
12/1952 M100- Departed
AN/TSQ-114A Trailblazer- Gone
Re: Restoration of an A2 now underway 7/15
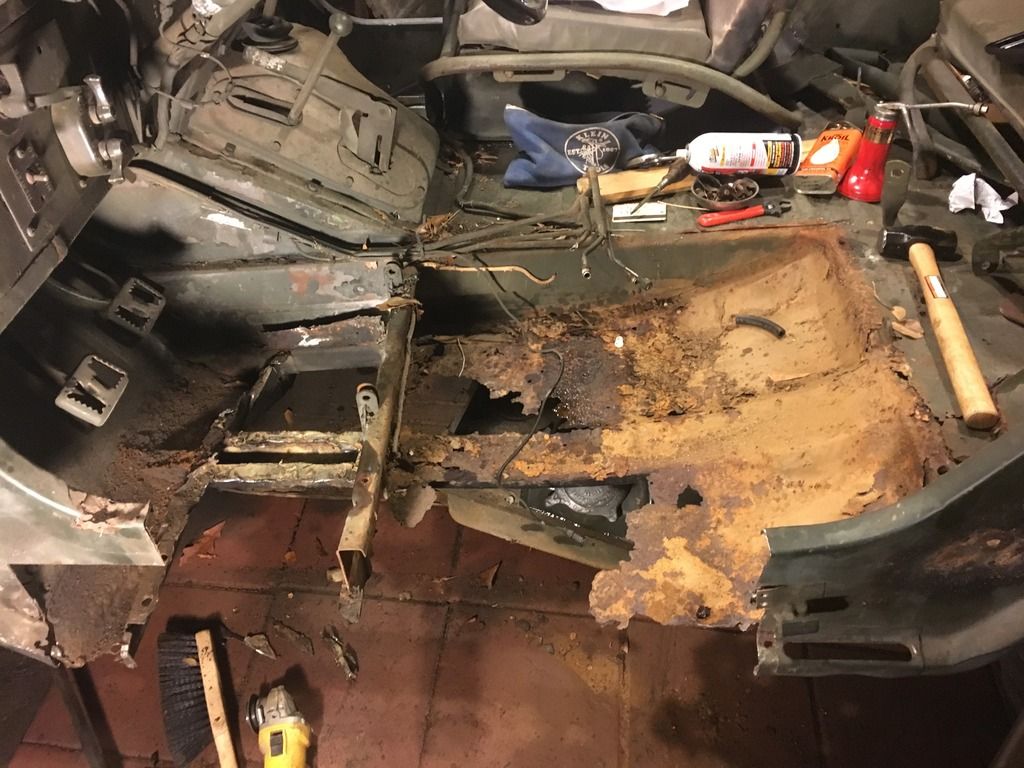
Work under way, basically cutting out left and right panels and floors.
http://i1304.photobucket.com/albums/s53 ... mi9t7q.jpg
Question for the group- I have new floors from Guy. what are people doing for the pans that go under the gas tank? They are dished out.
http://i1304.photobucket.com/albums/s53 ... mi9t7q.jpg
Question for the group- I have new floors from Guy. what are people doing for the pans that go under the gas tank? They are dished out.

Re: Restoration of an A2 now underway 7/15
They are all trying to talk Guy into making that floor pan!Question for the group- I have new floors from Guy. what are people doing for the pans that go under the gas tank? They are dished out.
1964 M151A1
1984 M1008
1967 M416
04/1952 M100
12/1952 M100- Departed
AN/TSQ-114A Trailblazer- Gone
1984 M1008
1967 M416
04/1952 M100
12/1952 M100- Departed
AN/TSQ-114A Trailblazer- Gone


Re: Restoration of an A2 now underway 7/15
Nice to see one uglier than mine! 
Some people are too busy knowing it all to ever learn anything
Re: Restoration of an A2 now underway 7/15
Fergrn, actually makes me feel better about it . As I started pulling it apart I thought, yikes, doesnt look too good. Then I told myself I was just being a wimp.
Good to know it really doesnt look too good.
Good to know it really doesnt look too good.
Re: Restoration of an A2 now underway 7/15
Had to make new curved parts that fit over the side plates at the front of the cab. Found a pretty good way- Brake the metal with shallow sides, it can then be bent. Then wide side parts on .

Re: Restoration of an A2 now underway 7/15

working on body sides

this picture shows the repair of a wheel fairing. The new part has been flanged with a flanging vice grip
-
Vzike

- Sergeant Major of the "G"

- Posts: 729
- Joined: December 27th, 2013, 4:05 pm
- Location: Jupiter, Florida
Re: Restoration of an A2 now underway 7/15
I found you can find old unservicable fuel tanks pretty easily. I cut the bottom out of two of them. One was pretty rusty, but the upcurved parts were still useable. I fit it (Make damn sure you keep putting the tank in place and that it fits flat to the bolting surfaces before you weld anything up) and used a lot of tacking and hammering, to get it flared out to fit. The one I'm working on right now needed the whole thing, so I found a swiss cheese bottom, used the same technique, then fiberglassed it from the bottom. It came out looking right.Question for the group- I have new floors from Guy. what are people doing for the pans that go under the gas tank? They are dished out.
Vin Zike