

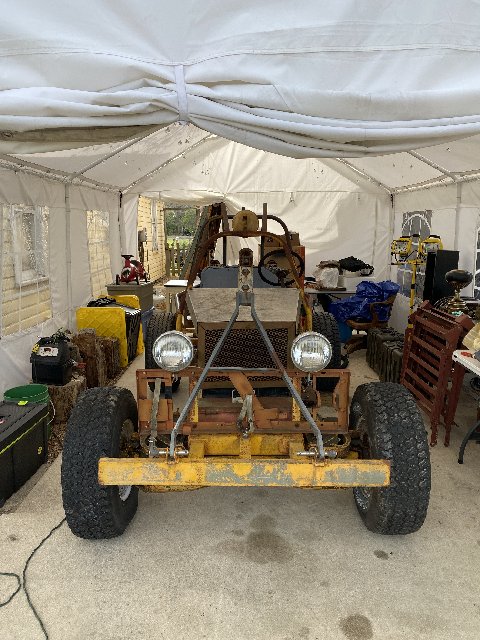
Those bumpers have got to go....as do those farby civilian lights and that ridiculous pioneer kit rack. I have military kit for lighting.
As you may have observed, this thing is OD under all that awful yellow paint. What is to be found under the OD is anyone's guess.
Beverly Hillbillies
Moderators: rickf, raymond, Mr. Recovery
-
Hambone
- Brigadier General

- Posts: 2506
- Joined: October 1st, 2010, 12:19 am
- Location: El Dorado, Arkansas
Re: Beverly Hillbillies
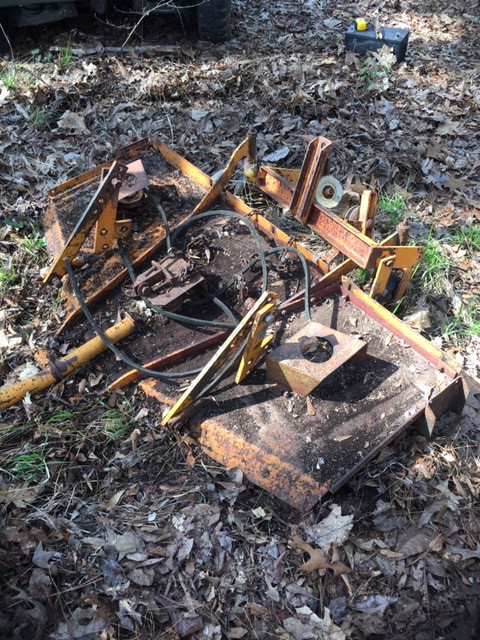
I have exactly what you need for that unit, it's the belly mower from my cub tractor, 4WS and a 60" cut, you just thought you had seen a Bad Boy mower,  and you won't have to paint it.
Re: Beverly Hillbillies
I'll take two!
Re: Beverly Hillbillies
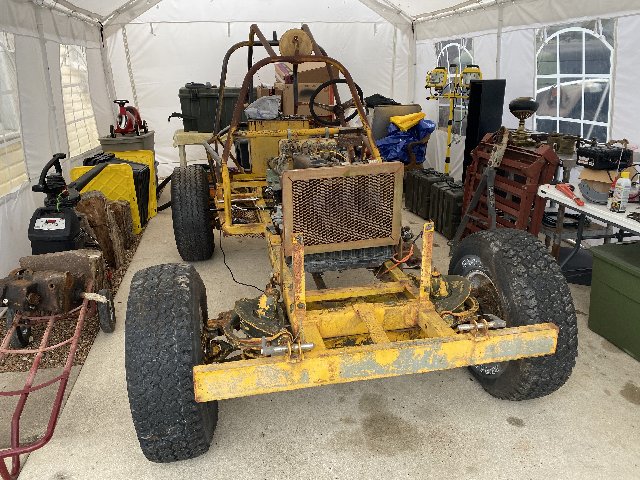
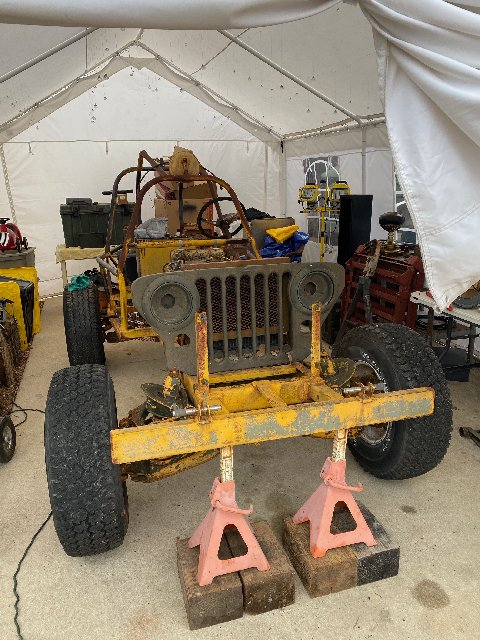
Rain is reportedly on the way and I have an open transmission. Sooooo, I backed The Shmoo up into the driveway and put it in the tent. The tow bar made that easy. Oh boy, these tires are in awful shape. West Texas sun eats tires for breakfast, lunch and dinner. The right front didn't like being dragged a little bit sideways and lost air because of it.
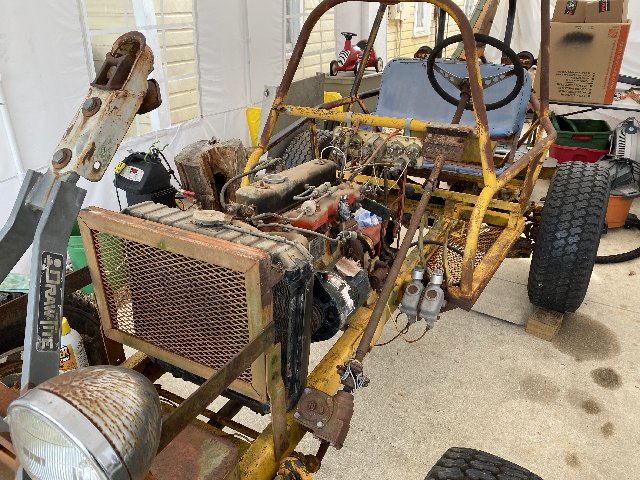
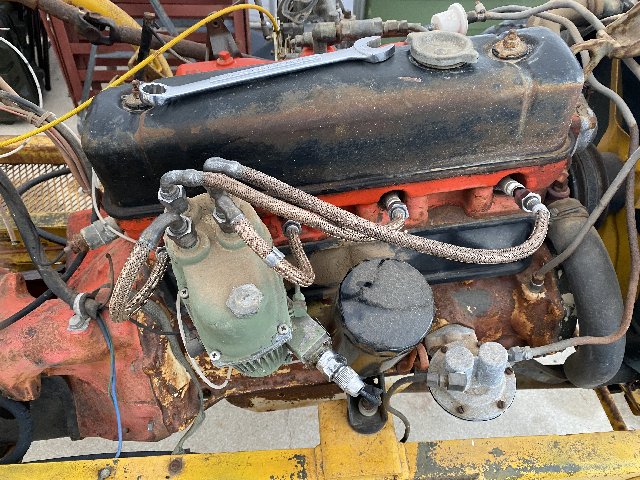
Took the hood off and began a bit of a tidy-up just to fiddle with it and get a sense of it. OMG!...some yahoo welded the bracket that supports the throttle pedal/arm to the end of the exhaust manifold! Wow. Just...uh....WOW. That has to be a first and odd as it may seem...the darned thing not only works, it's rock solid. Weird.
Cleaned off the old carb-intake gasket and the studs. Wiped away some of the dust that had gathered on the valve cover and intake which is a rather attractive shade of orange, by the way. The head is equally as orange whereas the block is something else. I wonder if this head has been redone. Wouldn't that be nice!
Removed the choke cable and wire-wheeled it and painted it because it was so thoroughly rusty on the outside but still working well on the inside. And I began inspecting and cleaning the battery cables since their terminals all looked like they hadn't been touched in years. I discovered that the positive terminal on the starter has something of a section reduction in the middle of the threads. I added a washer to move the nut back off that area and into some better threads because it was definitely NOT tightening down.. That little trick may last a day, or a month, or a year. Eventually, I suppose I should send it down to have a new terminal put on the starter...provided the starter works well and there is other evidence that I should move forward on this.
Radiator is bone dry...hopefully on purpose. I ordered a NOS steering flange (those are not cheap) and a carb gasket. I don't know if replacing the steering flange with NOS is the best way to go but whatever I get from Red River will not have been baking in the west Texas sun like this one had. Whether I keep it, or eventually sell it, those are certainly must-have items so I'm willing to spend a few bucks on them, even at this early stage. Otherwise, I'm not going on a heroic spending spree on this thing until I get some compression numbers on those cylinders and from there, I'll begin working up a plan.
By the way, for those of you who are trying to get a sense of the size of this thing, it's actually shorter than, say, a M38 and after those ridiculous bumpers are whacked of it will be even shorter still.
Pictures later, gang.
Cheers,
TJ


-
terratek
- Sergeant

- Posts: 62
- Joined: January 29th, 2019, 5:36 am
- Location: San Antonio, TX & Terlingua, TX
Re: Beverly Hillbillies
wasn't me
i think i sprayed down the cable with pb or kroil, forget which, when i first picked it upRemoved the choke cable and wire-wheeled it and painted it because it was so thoroughly rusty on the outside but still working well on the inside.
i found the batteries that were on it when i picked it up, champion gold series, other than that the labels are bleached and one has post leaking acid... will get measurements and cross ref to group size for you later.And I began inspecting and cleaning the battery cables since their terminals all looked like they hadn't been touched in years.
wasn't me, and starter worked strong when i got it.I discovered that the positive terminal on the starter has something of a section reduction in the middle of the threads. I added a washer to move the nut back off that area and into some better threads because it was definitely NOT tightening down.. That little trick may last a day, or a month, or a year. Eventually, I suppose I should send it down to have a new terminal put on the starter...provided the starter works well and there is other evidence that I should move forward on this.
drained it a year or so ago when i decided I didn't have the time to play with it right then, forgot to tell youRadiator is bone dry...hopefully on purpose.
btw, i didn;t send a little manual charger home with you, did i?
1967 United Tractor CN-40-A
1972 M109A3
1987 M105A2
19?? M151 Sand Rail (passed on to the next victim)
1972 M109A3
1987 M105A2
19?? M151 Sand Rail (passed on to the next victim)
Re: Beverly Hillbillies
Thanks for the feedback. I'm just working through this, trying to get a sense of it...and trying to figure out why someone stopped driving it. By the way, that evaporust really seems to be doing something. With some care, I think we have a real shot at salvaging this trans. Is there a place in town that carries that product on the shelves?
Cheers,
TJ
Cheers,
TJ
-
terratek
- Sergeant
- Posts: 62
- Joined: January 29th, 2019, 5:36 am
- Location: San Antonio, TX & Terlingua, TX
Re: Beverly Hillbillies
horrible freight carries evaporust, the stuff i coated the trans in is corrosion-x, the stuff used on the frame and pretty much anywhere i was going to paint at some point is corroseal.
be careful with evaporust, it works amazaing, but i have had it pit metal when i forgot a part for a few days
be careful with evaporust, it works amazaing, but i have had it pit metal when i forgot a part for a few days
1967 United Tractor CN-40-A
1972 M109A3
1987 M105A2
19?? M151 Sand Rail (passed on to the next victim)
1972 M109A3
1987 M105A2
19?? M151 Sand Rail (passed on to the next victim)
Re: Beverly Hillbillies
Well, that sounds like white vinegar...
Nope, we didn't have a charger.
Nope, we didn't have a charger.


Re: Beverly Hillbillies
You two sound like brothers the way you are finding (and losing) stuff in the piles of stuff you have! And yes, I have NO room to talk. Almost literally no room!
1964 M151A1
1984 M1008
1967 M416
04/1952 M100
12/1952 M100- Departed
AN/TSQ-114A Trailblazer- Gone
1984 M1008
1967 M416
04/1952 M100
12/1952 M100- Departed
AN/TSQ-114A Trailblazer- Gone
-
terratek
- Sergeant
- Posts: 62
- Joined: January 29th, 2019, 5:36 am
- Location: San Antonio, TX & Terlingua, TX
Re: Beverly Hillbillies
In my defense, i found it right before i lost it again, so there is that 
1967 United Tractor CN-40-A
1972 M109A3
1987 M105A2
19?? M151 Sand Rail (passed on to the next victim)
1972 M109A3
1987 M105A2
19?? M151 Sand Rail (passed on to the next victim)
Re: Beverly Hillbillies
Did a few things today...generally just futzing around.
Wrapped up the job of cleaning electrical contacts. The ground point to the frame was totally rusty. The retaining bolt goes through and through the frame so I removed that, got the wire wheel out and quickly got down to base metal on the frame. Reinstalled with new hardware and, as with all the other electrical connections, reassembled it with dielectric grease.
Made two turns of a nut on the terminal of the starter solenoid and *SNAP*...the stud separated without any warning whatsoever.
FUDGE MONKEYS!
Good one moment, gone the next. Grrrrr. So, NAPA gets $51 and I get a brand new 24v solenoid...with an all steel housing. But, I am now, quite happily, through with that. Years of neglect (which did not take place on terratek's watch) are starting to turn around and things on this rig are starting to look a little more businesslike.
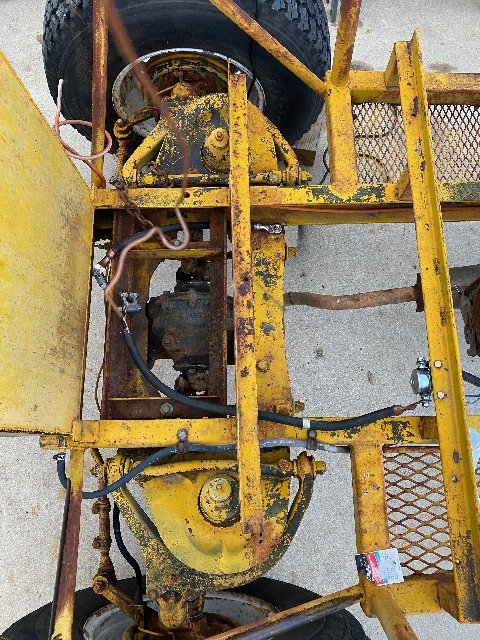
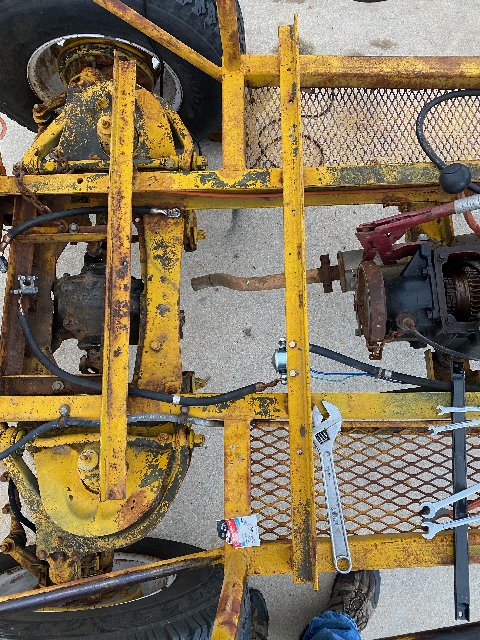
Turned my attention to loosening up the bolts on the universal joint on the rear prop shaft. Someone had assembled them long ago without lock washers. As a result, the bolts protruded out the other side of the flange and had rusted. These are fine thread bolts. PB Blaster and a dremel tool brush got the worst of it. Then it was only a matter of working them back and forth until they came free.
The rear output flange from the transmission was still firmly attached to the prop shaft and I found galling on the sleeve so that is certainly not going back on without a new sleeve installed. I also find that the shifter bits in the transmission top cover are still reluctant to move. So, I went and recovered Xloflyr's junk transmission (which is just rusted to bits on the inside). It will yield yet another top cover and according to Xloflyr, it also has a fresh rear seal and rear output flange with a good sleeve. Just what the doctor ordered!
I removed the rear tail lights which were wholly degraded and tucked the wires away. Soon, the big, stupid looking headlights will be gone, along with that ridiculous pioneer kit frame. My vision for this involves bringing it more into pseudo-military configuration. Totally bogus, of course, but that is more my 'thing'..
I found the return spring for the throttle in the tool box and put it on. Then I found that the throttle pedal mechanism was pretty stiff from being rusted so I lubed those joints with PB Blaster and 3-in-1 oil and worked them until they moved freely. Will follow up tomorrow with another dose to rinse away whatever minute particles of rust I can manage to sluice out.
Quick release for the steering wheel continues to be reluctant to come off the steering column. Will save that job for later.
Meanwhile, the right front tire continues to lose air. No matter, we don't have a runner...yet...and plenty of air to replenish it as we go.
Maybe tomorrow I will borrow the battery from the half track and, coupled with the battery I use for my winches, I will have 24v to play with. I'm getting close to turning this engine over and getting some numbers on those cylinders! WooHOO!
Cheers,
TJ
Wrapped up the job of cleaning electrical contacts. The ground point to the frame was totally rusty. The retaining bolt goes through and through the frame so I removed that, got the wire wheel out and quickly got down to base metal on the frame. Reinstalled with new hardware and, as with all the other electrical connections, reassembled it with dielectric grease.
Made two turns of a nut on the terminal of the starter solenoid and *SNAP*...the stud separated without any warning whatsoever.
FUDGE MONKEYS!
Good one moment, gone the next. Grrrrr. So, NAPA gets $51 and I get a brand new 24v solenoid...with an all steel housing. But, I am now, quite happily, through with that. Years of neglect (which did not take place on terratek's watch) are starting to turn around and things on this rig are starting to look a little more businesslike.
Turned my attention to loosening up the bolts on the universal joint on the rear prop shaft. Someone had assembled them long ago without lock washers. As a result, the bolts protruded out the other side of the flange and had rusted. These are fine thread bolts. PB Blaster and a dremel tool brush got the worst of it. Then it was only a matter of working them back and forth until they came free.
The rear output flange from the transmission was still firmly attached to the prop shaft and I found galling on the sleeve so that is certainly not going back on without a new sleeve installed. I also find that the shifter bits in the transmission top cover are still reluctant to move. So, I went and recovered Xloflyr's junk transmission (which is just rusted to bits on the inside). It will yield yet another top cover and according to Xloflyr, it also has a fresh rear seal and rear output flange with a good sleeve. Just what the doctor ordered!
I removed the rear tail lights which were wholly degraded and tucked the wires away. Soon, the big, stupid looking headlights will be gone, along with that ridiculous pioneer kit frame. My vision for this involves bringing it more into pseudo-military configuration. Totally bogus, of course, but that is more my 'thing'..
I found the return spring for the throttle in the tool box and put it on. Then I found that the throttle pedal mechanism was pretty stiff from being rusted so I lubed those joints with PB Blaster and 3-in-1 oil and worked them until they moved freely. Will follow up tomorrow with another dose to rinse away whatever minute particles of rust I can manage to sluice out.
Quick release for the steering wheel continues to be reluctant to come off the steering column. Will save that job for later.
Meanwhile, the right front tire continues to lose air. No matter, we don't have a runner...yet...and plenty of air to replenish it as we go.
Maybe tomorrow I will borrow the battery from the half track and, coupled with the battery I use for my winches, I will have 24v to play with. I'm getting close to turning this engine over and getting some numbers on those cylinders! WooHOO!
Cheers,
TJ
Re: Beverly Hillbillies
Today, more progress and one tiny step back.
Still cleaning up some crud here and there. Returning to the transmission daily, to spray more PB Blaster on those rusty bits. Noticing a lot of post production add-ons are not square to the frame. If you find a welder out in Del Rio who has both eyes on one side of his head, you'll have your man. Even the engine is not square to the frame though I think that is just a matter of making some adjustments.
I began the morning with removing the junk from the front end. Headlamps, pioneer rack, tool chest, all have been removed. Pulled the reluctant quick-release pins from the tow bar and removed it temporarily. That tow bar is the only good reason for having a front bumper on this thing.
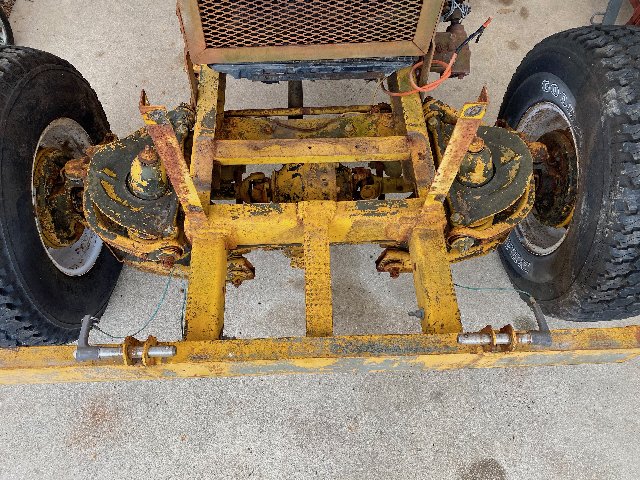
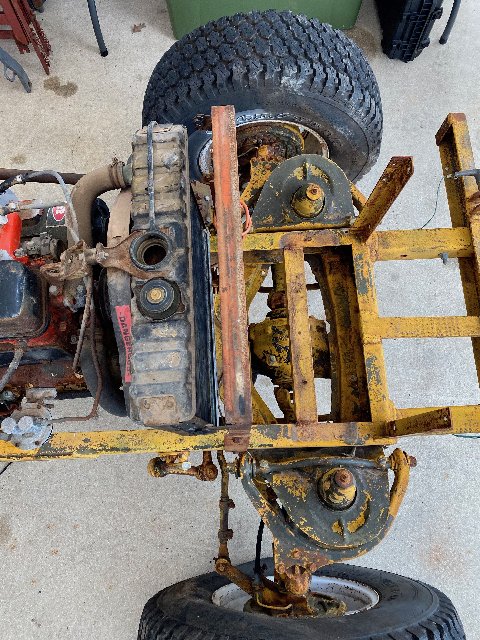
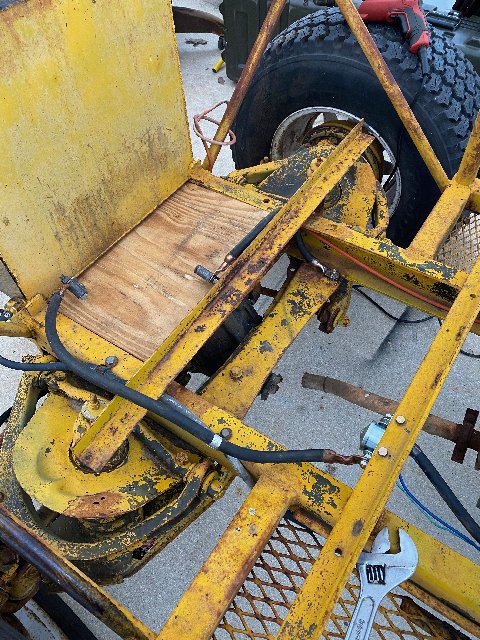
Jacked up the front end and got it up on jack stands so as to be able to turn the front wheels and the top shaft of the transmission and as an extra matter of safety if we get this engine to run. I also want to pull a front wheel to see how these things are held on there because I'm seeing the military lug nuts on civvy wheels. Not a good combination. There is no drive shaft to the rear end, as yet but that's in the works.

Removed, cleaned and inspected the shielded spark plug wires. One spark plug came out as it was not tight at all. Found it to be a Champion XMJ 17C MS35909-2. These are shielded plugs of unknown application and curiously, just a bit longer than our standard M151 spark plugs. Guess how I found out. A regular spark plug socket is too shallow, even with the rubber removed, to get even the tiniest bite on the base of the spark plug. The solution - cut a spare 13/16 deep well socket in half and weld it to another one of full length. Done and done. The spark plugs look uniformly black across all cylinders. If anything, they are perhaps a bit more sooty than they should be. I wonder what those spark plugs go to. (edit post - after a brief internet search, it appears these plugs are entirely okay for the MUTT motor.)
Found I had a third 12v battery around here so, there is no need to scavenge one from the half track. I put it on the trickle charger. It was slow to come up but once it got past 46%, all was well. Will load test it in a while but it's happily taking a charge. Cut and laid in some plywood over the original battery mount to provide ample room for the two batteries and this is only for tinkering with this in the tent. I do not like the idea of batteries and fuel sharing the same space.
With great difficulty I managed to get the distributor open for inspection. Those six screws... Oh, good LORD...those six screws! Never have I encountered six screws so UN-willing to UN-screw. I was, quite literally, on top of the screwdriver and using all the dirty tricks we know and love to use to defeat obstinate screws. Naturally, the last one is the one that bites back. The darned thing actually made half a turn and then snapped off. Oh, cruel Fate!! (I'm having that happen a lot more often than I care to, lately.) But, the cap is off and I find that I have a very tidy interior with original kit and a Prestolite electronic ignition.

As to the matter of the 6th screw, I chose a very small drill to pilot a larger bit in preparation for restoring the hole...(which was entirely the wrong decision) and snapped it off in the remains of the old screw.
%^$#@*&^%ing FUDGE MONKEYS!!!
It will have to be drilled out from the bottom now...if I do anything with it at all. Having 5 out of 6 ain't bad! Cleaned up the corrosion and the screws with a Dremel tool, tapped the holes out to clean them out and returned everything to where it belonged.
I decided to pull the speedometer cable since the fittings were crusty with dirt and rust. When the metal looks like the topping on Mrs. Smith's Dutch Apple pie, it's time to deal with it! This turned out to be a good move as there was a lot of powdered rust debris in the socket on the trans. Wire wheeled the rust off the ends of the cable and hit them with primer, to be followed by paint and a shot of lubricant after that, before reinstalling.
On a lark, I plucked a M38 grill from the pile and laid it across the frame rails. I must say, it has a certain je ne sais quoi though it would be hardly an original idea. Still, I like it. Wish I had a spare MUTT grill laying around! Now that would be just the thing.
OH, SO CLOSE to getting this engine turning over but I've done enough for one day. Today,
Cheers,
TJ.
Still cleaning up some crud here and there. Returning to the transmission daily, to spray more PB Blaster on those rusty bits. Noticing a lot of post production add-ons are not square to the frame. If you find a welder out in Del Rio who has both eyes on one side of his head, you'll have your man. Even the engine is not square to the frame though I think that is just a matter of making some adjustments.
I began the morning with removing the junk from the front end. Headlamps, pioneer rack, tool chest, all have been removed. Pulled the reluctant quick-release pins from the tow bar and removed it temporarily. That tow bar is the only good reason for having a front bumper on this thing.
Jacked up the front end and got it up on jack stands so as to be able to turn the front wheels and the top shaft of the transmission and as an extra matter of safety if we get this engine to run. I also want to pull a front wheel to see how these things are held on there because I'm seeing the military lug nuts on civvy wheels. Not a good combination. There is no drive shaft to the rear end, as yet but that's in the works.
Removed, cleaned and inspected the shielded spark plug wires. One spark plug came out as it was not tight at all. Found it to be a Champion XMJ 17C MS35909-2. These are shielded plugs of unknown application and curiously, just a bit longer than our standard M151 spark plugs. Guess how I found out. A regular spark plug socket is too shallow, even with the rubber removed, to get even the tiniest bite on the base of the spark plug. The solution - cut a spare 13/16 deep well socket in half and weld it to another one of full length. Done and done. The spark plugs look uniformly black across all cylinders. If anything, they are perhaps a bit more sooty than they should be. I wonder what those spark plugs go to. (edit post - after a brief internet search, it appears these plugs are entirely okay for the MUTT motor.)
Found I had a third 12v battery around here so, there is no need to scavenge one from the half track. I put it on the trickle charger. It was slow to come up but once it got past 46%, all was well. Will load test it in a while but it's happily taking a charge. Cut and laid in some plywood over the original battery mount to provide ample room for the two batteries and this is only for tinkering with this in the tent. I do not like the idea of batteries and fuel sharing the same space.
With great difficulty I managed to get the distributor open for inspection. Those six screws... Oh, good LORD...those six screws! Never have I encountered six screws so UN-willing to UN-screw. I was, quite literally, on top of the screwdriver and using all the dirty tricks we know and love to use to defeat obstinate screws. Naturally, the last one is the one that bites back. The darned thing actually made half a turn and then snapped off. Oh, cruel Fate!! (I'm having that happen a lot more often than I care to, lately.) But, the cap is off and I find that I have a very tidy interior with original kit and a Prestolite electronic ignition.
As to the matter of the 6th screw, I chose a very small drill to pilot a larger bit in preparation for restoring the hole...(which was entirely the wrong decision) and snapped it off in the remains of the old screw.
%^$#@*&^%ing FUDGE MONKEYS!!!
It will have to be drilled out from the bottom now...if I do anything with it at all. Having 5 out of 6 ain't bad! Cleaned up the corrosion and the screws with a Dremel tool, tapped the holes out to clean them out and returned everything to where it belonged.
I decided to pull the speedometer cable since the fittings were crusty with dirt and rust. When the metal looks like the topping on Mrs. Smith's Dutch Apple pie, it's time to deal with it! This turned out to be a good move as there was a lot of powdered rust debris in the socket on the trans. Wire wheeled the rust off the ends of the cable and hit them with primer, to be followed by paint and a shot of lubricant after that, before reinstalling.
On a lark, I plucked a M38 grill from the pile and laid it across the frame rails. I must say, it has a certain je ne sais quoi though it would be hardly an original idea. Still, I like it. Wish I had a spare MUTT grill laying around! Now that would be just the thing.
OH, SO CLOSE to getting this engine turning over but I've done enough for one day. Today,
Cheers,
TJ.
Re: Beverly Hillbillies
Today was one long hit & miss drama but, at dusk I managed to drop everything else, turn my attention to The Doom Buggy (the new name is official, by the way, in response to the times we're living in). After a small struggle I managed to remove both halves of the steering flange. I must say, terratek had done a very satisfactory job of wiring that thing up. It was a shame to undo it because it certainly shows what can be accomplished in a pinch. He needs to be in the Dakar Rally!
The new flange arrived today and it is NOS and perfect in every way. So glad that it got through. I've a feeling all shippers are going to begin devoting their resources to prioritizing certain items just as Amazon has done....which is not a bad idea.
I didn't get the new flange put on but I did get the mating surfaces de-rusted and treated with metal prep so they'll be good till I get back to it.
Cheers,
TJ
-
terratek
- Sergeant
- Posts: 62
- Joined: January 29th, 2019, 5:36 am
- Location: San Antonio, TX & Terlingua, TX
Re: Beverly Hillbillies
You think that was impressive? When i was living in west tx i fixed a driveshaft with baling wire, barbed wire, and duct tape... at least long enough to get me to 5 miles of dirt road to the main road... Had to do similar with steering linkage on my boss's old 4x4 until i could get it back to the shop.
If you need a cargo solution for the doombuggy, i still have some M1A1 bustle rack extensions. Fold up when not in use, fold down into a cage with 2 jerry can holders...
If you need a cargo solution for the doombuggy, i still have some M1A1 bustle rack extensions. Fold up when not in use, fold down into a cage with 2 jerry can holders...
1967 United Tractor CN-40-A
1972 M109A3
1987 M105A2
19?? M151 Sand Rail (passed on to the next victim)
1972 M109A3
1987 M105A2
19?? M151 Sand Rail (passed on to the next victim)