M718A1 restoration
Moderators: rickf, raymond, Mr. Recovery
-
Hambone
- Brigadier General

- Posts: 2511
- Joined: October 1st, 2010, 12:19 am
- Location: El Dorado, Arkansas
Re: M718A1 restoration
Must be the lighting, no wear or rust to speak of, less than 20,000 miles.
-
Hambone
- Brigadier General
- Posts: 2511
- Joined: October 1st, 2010, 12:19 am
- Location: El Dorado, Arkansas
Re: M718A1 restoration
Back on my project after 3 months of recovering from snow damage. After further inspection of the engine, I am finding black paint under the green, now I'm thinking they sprayed the engine when they put the carc paint on it, so I'm going back with black. Also found a broken exhaust bolt, time to try my hand at screw extraction.
You do not have the required permissions to view the files attached to this post.


Re: M718A1 restoration
Rusty bolt means at least it is a steel bolt and not galled stainless. Small flange means light duty head so be careful. Easy outs are designed to make the stuck bolt tighter! Just look at the design and think about what a wedge does. Drill the bolt out with a left hand bit after plenty of soaking with juice. It will usually unscrew itself as you are drilling. Finding left hand bits anymore can be a challenge.
1964 M151A1
1984 M1008
1967 M416
04/1952 M100
12/1952 M100- Departed
AN/TSQ-114A Trailblazer- Gone
1984 M1008
1967 M416
04/1952 M100
12/1952 M100- Departed
AN/TSQ-114A Trailblazer- Gone

Re: M718A1 restoration
Last place I got some lefties was at Lowes and they came in a blue tin. I would not recommend those.
1960 M151 Run #1
"There is one nut on a M151 that is very difficult to remove....." - K8icu
"She ain't a Cadillac and she ain't a Rolls, But there ain't nothin' wrong with the radio" - Aaron Tippin

"There is one nut on a M151 that is very difficult to remove....." - K8icu
"She ain't a Cadillac and she ain't a Rolls, But there ain't nothin' wrong with the radio" - Aaron Tippin
Re: M718A1 restoration
I usually just start with a 1/8 inch bit and drill all the way through as straight through the center as possible and progressively go bigger on the drills. Once you just start touching the threads stop and with a small punch or chisel carefully knock the edge that is left into the hole. Once you get about a third of it done the rest usually breaks out quickly. Patience is the name of the game here. If you absolutely have to use an easy then get the splined dive in type, They do not wedge the bolt tighter as much as the tapered twist type. They are substantially more money but there is a reason for that. Once you break off a hardened easy out in the broken bolt you are screwed! You had better hope there is enough sticking out to be able to weld a nut onto and even then you are still trying to turn the easy out so at that point you try to back the easy out out of the bolt. then go back to drilling.
https://www.amazon.com/RIDGID-35585-Ext ... 9801&psc=1
https://www.amazon.com/RIDGID-35585-Ext ... 9801&psc=1
1964 M151A1
1984 M1008
1967 M416
04/1952 M100
12/1952 M100- Departed
AN/TSQ-114A Trailblazer- Gone
1984 M1008
1967 M416
04/1952 M100
12/1952 M100- Departed
AN/TSQ-114A Trailblazer- Gone
-
Hambone
- Brigadier General
- Posts: 2511
- Joined: October 1st, 2010, 12:19 am
- Location: El Dorado, Arkansas
Re: M718A1 restoration
Got my broken exhaust bolt removed, getting a few things painted up, hard to get motivated with the paint and sanding when it's 100 degrees outside, excuse the shop, it needs a good cleaning. 
You do not have the required permissions to view the files attached to this post.
-
lpcoating
- Brigadier General
- Posts: 2030
- Joined: February 19th, 2013, 11:38 pm
- Location: Mansfield, PA
- Contact:
Re: M718A1 restoration
Looking good Buddy!
Guy
Guy
M151 Body Panels - http://www.m151bodypanels.com/
'68 A1 - Under full resto
'68 A1 - Under full resto


 Re: M718A1 restoration
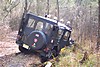
Nice to see some progress on the project! After 18 years of off roading, was time for a cosmetic restoration. Here is some of the stuff we painted.
You do not have the required permissions to view the files attached to this post.
Take Care,
Louie
M151A2,
KA2PFL,
MVPA 27368

Louie
M151A2,
KA2PFL,
MVPA 27368
-
Hambone
- Brigadier General
- Posts: 2511
- Joined: October 1st, 2010, 12:19 am
- Location: El Dorado, Arkansas
Re: M718A1 restoration
Lou
That looks good, Is that gloss or satin, I've been using satin.
That looks good, Is that gloss or satin, I've been using satin.
 Re: M718A1 restoration
Rust oleum satin. Gloss is too shiny. But will admit we did paint the entire underbody in gloss so the mud will wash off easier. We got to test that last week when we got stuck in a mud hole. All the mud washed off without scrubbing.
https://youtu.be/vIxKK0E-DhY
You do not have the required permissions to view the files attached to this post.
Take Care,
Louie
M151A2,
KA2PFL,
MVPA 27368
Louie
M151A2,
KA2PFL,
MVPA 27368
-
Hambone
- Brigadier General
- Posts: 2511
- Joined: October 1st, 2010, 12:19 am
- Location: El Dorado, Arkansas
Re: M718A1 restoration
That is true, though I like the look of flat, you just can't clean it, we used Pam cooking spray back in the wheeler days, it helped with the mud. You need to hook up with Rick and get a set of those lockers. 
Re: M718A1 restoration
Your right about the lockers! If you watched the video, pretty sure lockers would have pulled us through the first time. We sunk so deep in the front the bumper was down in the mud!
Take Care,
Louie
M151A2,
KA2PFL,
MVPA 27368
Louie
M151A2,
KA2PFL,
MVPA 27368
-
Hambone
- Brigadier General
- Posts: 2511
- Joined: October 1st, 2010, 12:19 am
- Location: El Dorado, Arkansas
Re: M718A1 restoration
Well I'm back in black, painted it with a high heat satin, painting was the easy part. Cleaning consisted of scraping the oily parts, hand wire brush, wire brush on drill, wire brush on Dremel tool, spraying down with degreaser and power washing twice which took about 6 hours.
You do not have the required permissions to view the files attached to this post.