Restoration of NBOER7
Moderators: rickf, raymond, Mr. Recovery
-
m38inmaine

- Staff Sergeant

- Posts: 153
- Joined: August 28th, 2019, 4:22 am
Re: Restoration of NBOER7
Thanks Rick, I have 4 engines here and of course all of them have the same style timing cover with the arrow shaped pointer, I went ahead and ordered one of the newer style type, it's always something. It looks like all they did was remove the arrow type and rivet the sheet metal one on with an offset in it to make it higher to clear the larger diameter pulley.
12B
Combat Engineer
Combat Engineer


Re: Restoration of NBOER7
That is the only difference. That is why most people just snap off the old one and weld back on where needed. Or find an old A2 timing cover and pull that one off and spot weld in on where needed. Pretty sure most of what I have right now is A1 except for my NOS engine.
1964 M151A1
1984 M1008
1967 M416
04/1952 M100
12/1952 M100- Departed
AN/TSQ-114A Trailblazer- Gone
1984 M1008
1967 M416
04/1952 M100
12/1952 M100- Departed
AN/TSQ-114A Trailblazer- Gone


Re: Restoration of NBOER7
I had a replacement engine installed for a brief period while I was repairing the original one. Same problem, but what I did was just bending the A1 style pointer to clear the 3 groove pulley.
The A2 timing pointer is actually a piece of bend sheet metal screwed to the timing cover and not welded as in case of an A1 engine.
The A2 timing pointer is actually a piece of bend sheet metal screwed to the timing cover and not welded as in case of an A1 engine.
You do not have the required permissions to view the files attached to this post.
Horst
1972 USMC M151A2 w/ROPS (ex Barstow) and M416
1962 M201 and trailer
1966 GTO,1982 E350 Skoolie, 1987 SJ413, 1987 911
Gone: 2xM35A2c, Unimog 404S, Hanomag AL28, DKW Munga
1972 USMC M151A2 w/ROPS (ex Barstow) and M416
1962 M201 and trailer
1966 GTO,1982 E350 Skoolie, 1987 SJ413, 1987 911
Gone: 2xM35A2c, Unimog 404S, Hanomag AL28, DKW Munga
-
m38inmaine
- Staff Sergeant
- Posts: 153
- Joined: August 28th, 2019, 4:22 am
Re: Restoration of NBOER7
Thank you for the replies. New cover and 3 groove pulley installed. I tried hand lapping the valves but I think the lap line on the valves is too wide and not really sealing correctly so while I'm in the big city tomorrow I am going to drop it off at the machine shop for a re-grind, only want to do this once so might as well do it right.
You do not have the required permissions to view the files attached to this post.
12B
Combat Engineer
Combat Engineer
-
m38inmaine
- Staff Sergeant
- Posts: 153
- Joined: August 28th, 2019, 4:22 am
Re: Restoration of NBOER7
I have the engine back together and ready to test run, I have tried uploading pictures and progress several times but keep getting a spam block IP message thingy, trying to work it out.
12B
Combat Engineer
Combat Engineer
-
m38inmaine
- Staff Sergeant
- Posts: 153
- Joined: August 28th, 2019, 4:22 am
Re: Restoration of NBOER7
Sorry for the long pause on this project but I am back on it, long story short a carb swap fixed the running issue, more to follow.
12B
Combat Engineer
Combat Engineer
-
m38inmaine
- Staff Sergeant
- Posts: 153
- Joined: August 28th, 2019, 4:22 am
Re: Restoration of NBOER7
Sorry for the long lapse in posting, I have started back up again and given the great weather I used up 8 bags of sand and hit it hard. I skipped over the new metal and will hit that later. Over the next couple of days I will get it up on it's side to do the bottom. My goal is to have it ready for the Weare NH rally in late July, every bolt on/in piece is finished, those wheels are just rollers.
You do not have the required permissions to view the files attached to this post.
12B
Combat Engineer
Combat Engineer
-
m38inmaine
- Staff Sergeant
- Posts: 153
- Joined: August 28th, 2019, 4:22 am
Re: Restoration of NBOER7
Sandblasting the bottom and in primer today. Next I will pull the front suspension out and rebuild it along with the brakes, then the rear suspension out/brakes and perhaps bushings.
You do not have the required permissions to view the files attached to this post.
12B
Combat Engineer
Combat Engineer
-
Hambone
- Brigadier General

- Posts: 2506
- Joined: October 1st, 2010, 12:19 am
- Location: El Dorado, Arkansas
Re: Restoration of NBOER7
Looking good!
-
m38inmaine
- Staff Sergeant
- Posts: 153
- Joined: August 28th, 2019, 4:22 am
Re: Restoration of NBOER7
Thanks Hambone, today I pulled the front suspension and primed the bottom, rainy here now so I had to improvise to get the job done. The rear suspension is only partially blasted so I didn't bother to prime it as it will be pulled and rebuilt as well. While I wait for the primer to cure I am going to strip and rebuild the front suspension assembly, 104 days and counting.
You do not have the required permissions to view the files attached to this post.
12B
Combat Engineer
Combat Engineer
-
m38inmaine
- Staff Sergeant
- Posts: 153
- Joined: August 28th, 2019, 4:22 am
Re: Restoration of NBOER7
I pulled and dismantled the front suspension today without issue, the rear was a different story. The bushing bolts were rusted solid in place, I had to remove the frame brackets to get the arm out, then used a cut off wheel to get the brackets off the bushing bolt. Tomorrow I will break out the hot wrench and remove the bushings, that will be a stinky mess for sure.
You do not have the required permissions to view the files attached to this post.
12B
Combat Engineer
Combat Engineer
-
Hambone
- Brigadier General
- Posts: 2506
- Joined: October 1st, 2010, 12:19 am
- Location: El Dorado, Arkansas
Re: Restoration of NBOER7
Those bushings can be a PITA, you can burn or drill out the rubber, then slowly cut through the outer bushing, once you get cut through, you will feel the hacksaw blade bind up, then they will knock right out.
You do not have the required permissions to view the files attached to this post.
-
lpcoating
- Brigadier General
- Posts: 2030
- Joined: February 19th, 2013, 11:38 pm
- Location: Mansfield, PA
- Contact:
Re: Restoration of NBOER7
Several years ago I replaced the rear bushings on my A2. I ordered them from a dealer and didn't realize they were imports. While doing some PM work this winter, I noticed they were in bad shape. I replaced with NOS. I recommend using NOS bushings.
Guy
Guy
Last edited by lpcoating on April 13th, 2024, 2:35 pm, edited 1 time in total.
M151 Body Panels - http://www.m151bodypanels.com/
'68 A1 - Under full resto
'68 A1 - Under full resto
-
lpcoating
- Brigadier General
- Posts: 2030
- Joined: February 19th, 2013, 11:38 pm
- Location: Mansfield, PA
- Contact:
Re: Restoration of NBOER7
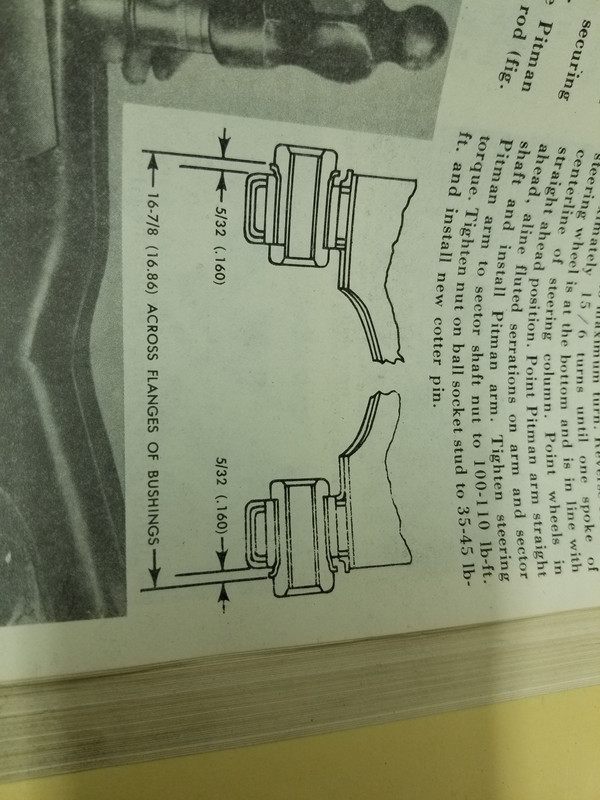
Also, there is a dimension in the manual for the distance between flanges. They are not pressed in flush.
Guy
Guy
M151 Body Panels - http://www.m151bodypanels.com/
'68 A1 - Under full resto
'68 A1 - Under full resto
-
Hambone
- Brigadier General
- Posts: 2506
- Joined: October 1st, 2010, 12:19 am
- Location: El Dorado, Arkansas
Re: Restoration of NBOER7
Definitely agree with Guy, the Chinese ones are not a good fit, I've tried them and had to do a lot of sanding, NOS is best.
You do not have the required permissions to view the files attached to this post.